Rotary Controller

The family CEO allowed me to go to SEMA, the world's largest automotive show, last year. You won't see any production cars there. It's focused on automotive suppliers, aftermarket parts and cool/insane custom-built cars and it's only open to people in the industry. My friend Will and I walked it all which is a lot to do in three days.

One of the primary things I was looking for was a rotary controller that I could integrate into my MoTeC ECU and PDMs. While I found several they were typically designed to work with a proprietary screen which meant that integration was a big question. I was really disappointed that MoTeC didn’t have a booth.

However, this week I received some parts from my MoTeC supplier and this marketing flyer was in the box...

The ability to configure menus and sub menus via their PC-based application is really cool. They don’t have anything on their website yet and the spec sheets aren’t available yet, but I have one on order. I think it's a great valentine's gift for the car;-)

Restomod Manual Climate Controls

Although my climate settings can be controlled via a smartphone app, I want manual controls in case the batteries run out on the phone, I forget my phone or the bluetooth interface has a glitch. The climate controls for most home built cars are awful. IMO Restomod makes the nicest ones on the market. I had their Reactor control on back order, but they announced their Elevate controller at SEMA and I dropped by their booth to check it out. They're less expensive so that's the only booth visit that saved me money!

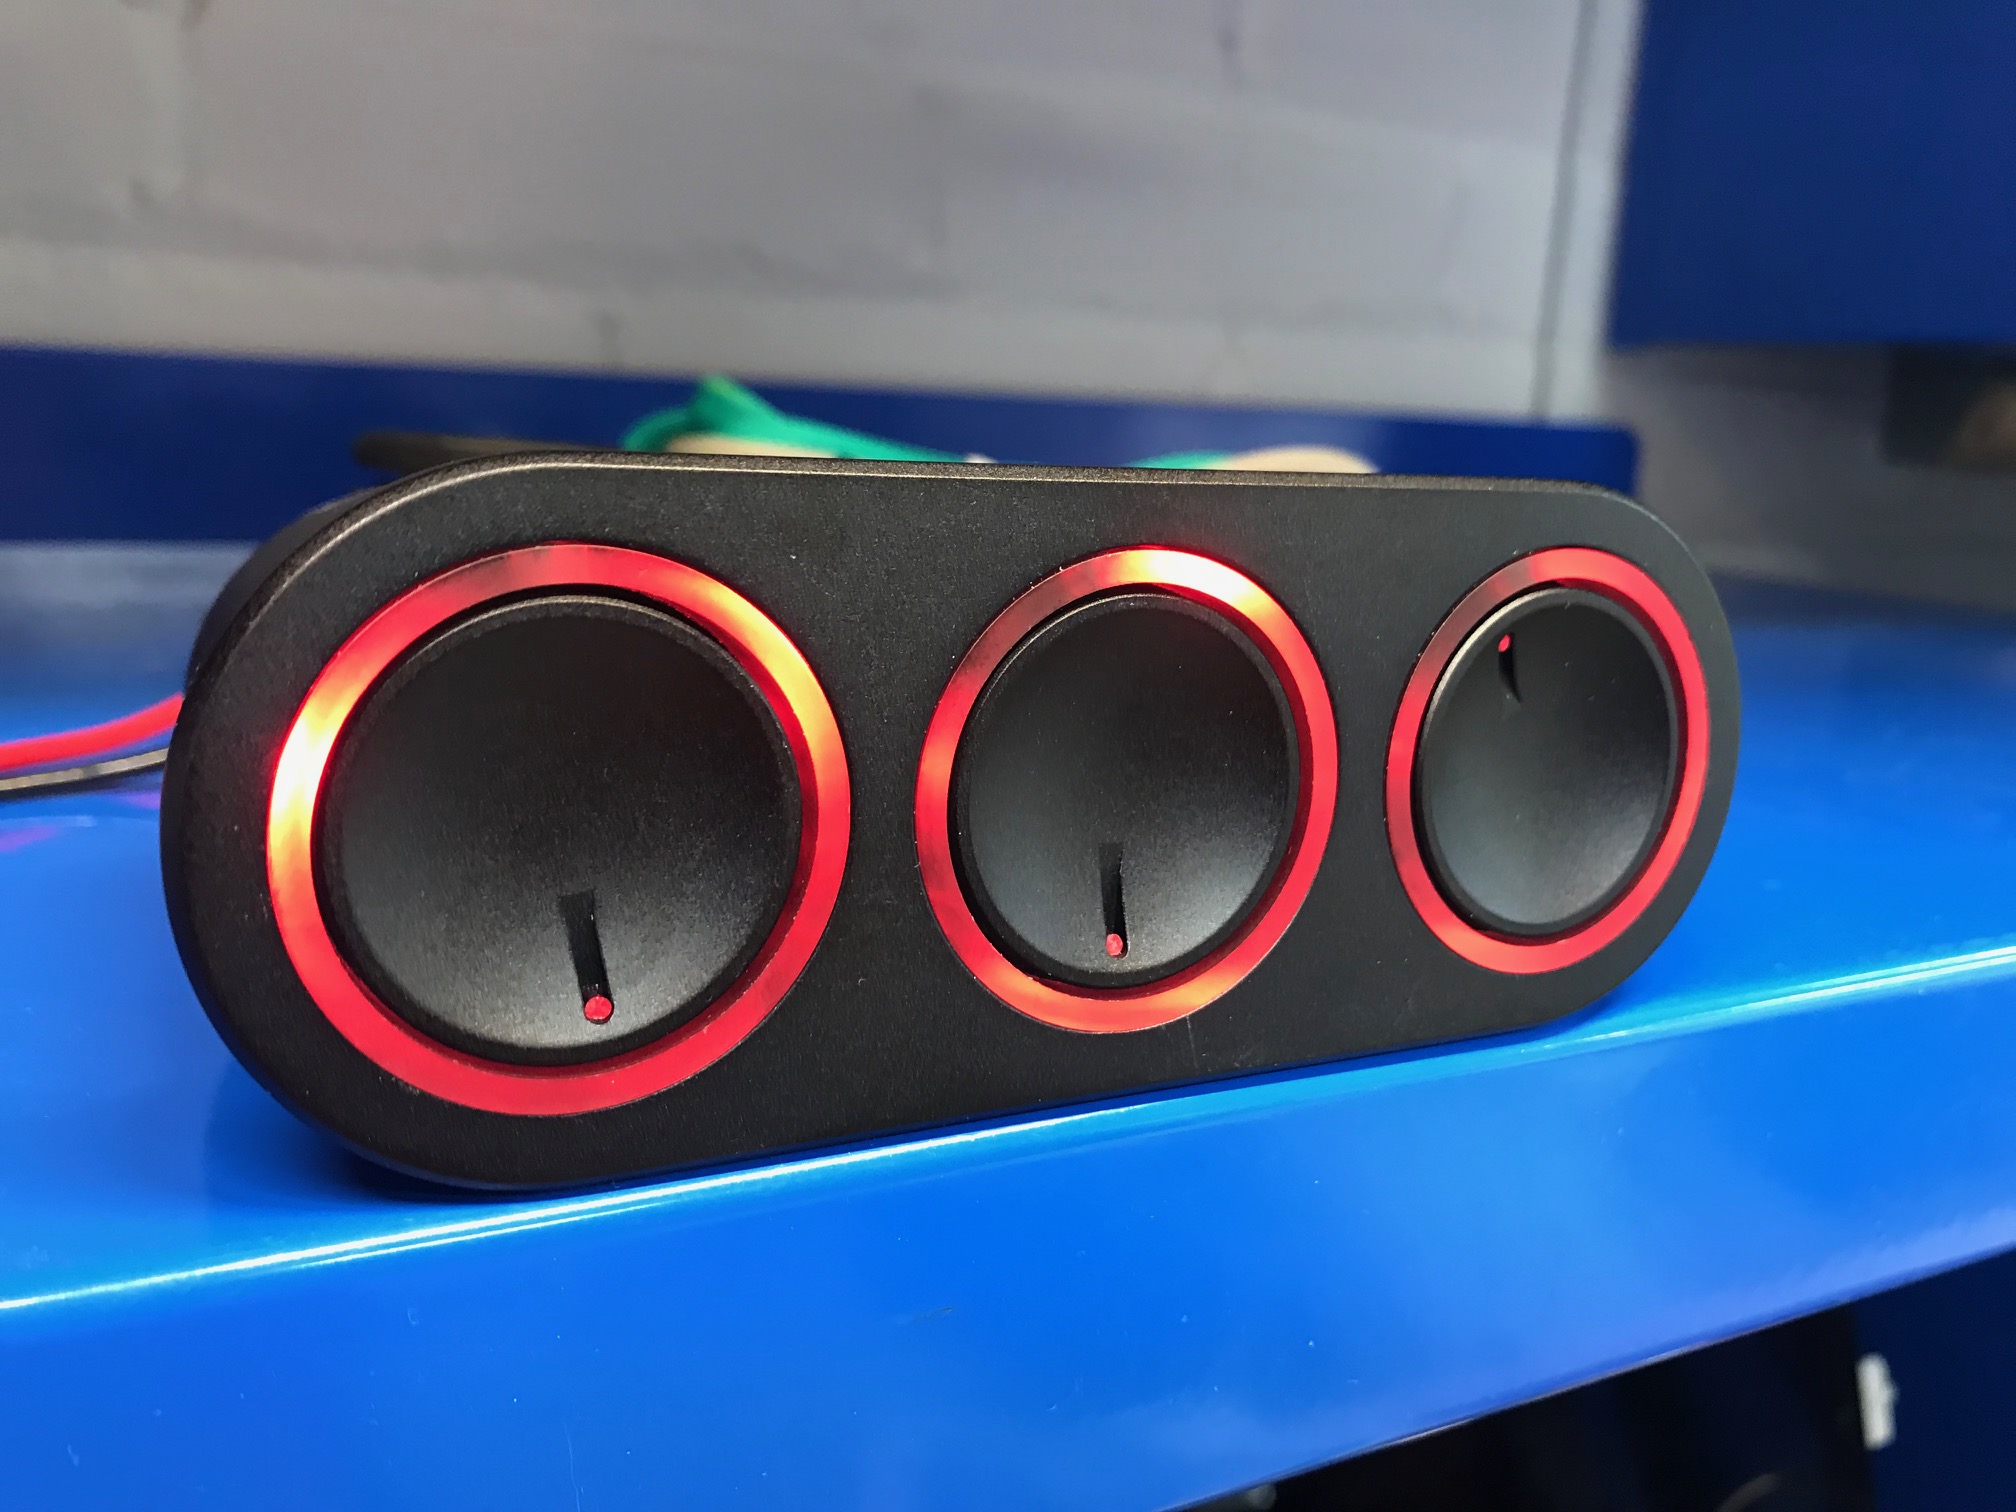
Like their other controls the Elevate control are made from billet 6061 aluminum. However, the knobs are completely flush until you push them at which point they pop out. They are very compact, look great and have a nice feel. I went with red LED back lighting, but I can easily change them to white, green, blue or cyan. The only thing thing that I don't like is that each of the four twist in/out LED modules have two wires hanging out the back. I'll need to clean that up when I figure out where I'm installing the controller.

Air Vent Adapter for the GT-R

I've met a lot of great people while building the SL-C. The community has a massive talent pool which is a critical resource when building this type of car. One of the guys that I've met is "H"... yeah, he's fun to look him up in my contact list. He's an amazing fabricator and the owner of H Craft Customs. He was also the chief fabricator for the Robertson Racing team which took third place at Le Mans with a modified Ford GT. The body of Superlite's GT-R (the "R" stands for Robertson) was modeled after their car.

Robertson Racing's Ford GT-based car

H is building a Superlite GT-R for himself and he's using lots of OEM parts removed when preparing the Ford GTs for racing. He's also building one for a customer. I wish I had a fraction of his fabrication skills or at least lived close enough to have him do some work on my car. However, computers are his Kryptonite and he asked me if I could design and 3D print a part that adapts Restomod Air's oval shape to the GT's 3" ID circle on the dashboard. He could make something by hand, but it's a fiddly part and he needs three, so 3D printing offers a good solution.

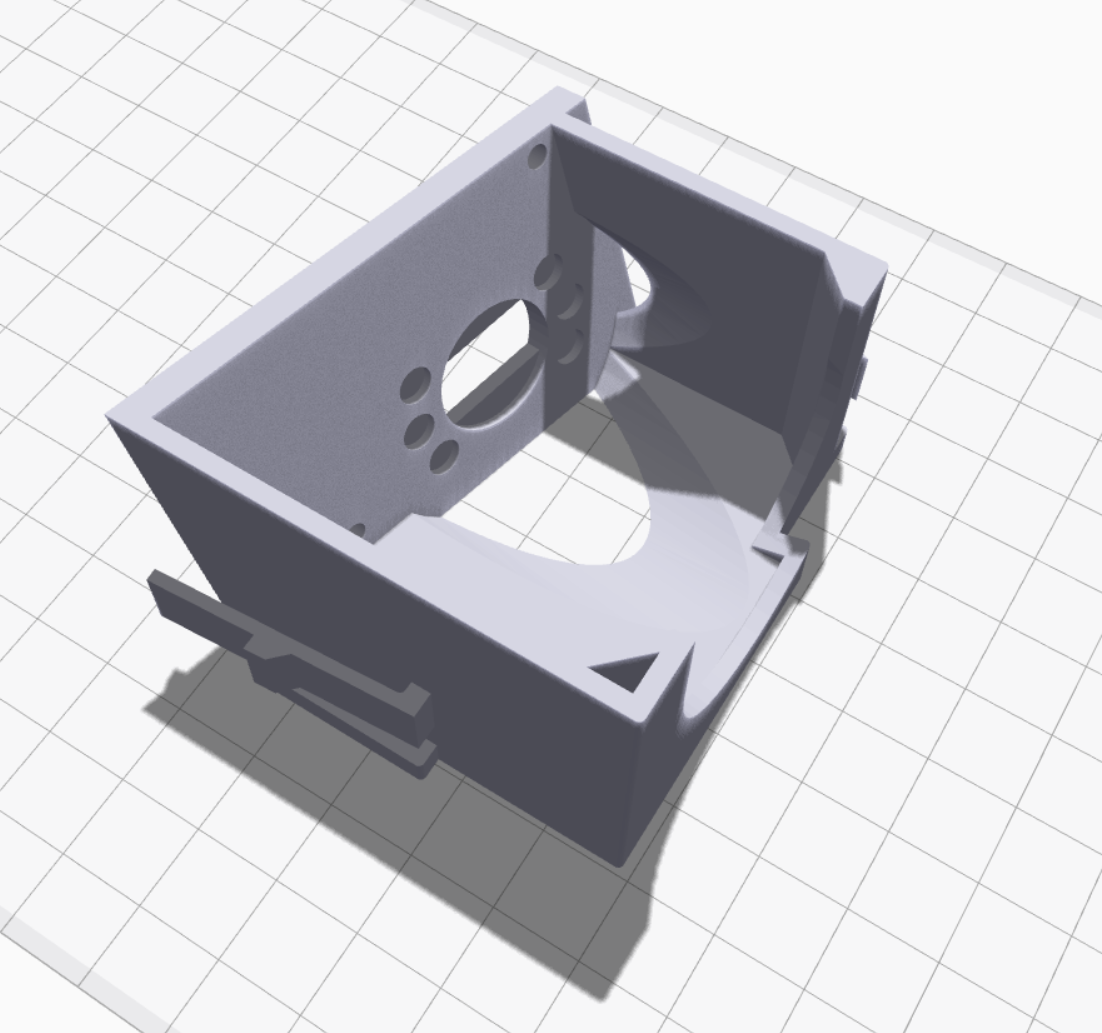
I kept trying to draw a hollow oval and a hollow circle and loft the two surfaces. I then recalled that SolidWorks is best at solids, so I extruded solid shapes, lofted their faces and then used the shell feature to hollow out the interior. Once I figured that out it was easy to design the part including a barb, mounting bosses, etc. -- I mailed it to him yesterday, so we'll have to see it it works.

In the screenshot of the 3D slicer you will note it now indicates the estimated materials price and the mass of the object. I had requested those features a while ago (I assume that others have requested it) and via the magic of cloud-based software the feature just appeared. The next picture shows another feature that just appeared. It's the bottom of the removable support structure. You will note how much more sparse the section on the right is than the one on the left. This "turbo supports" feature reduce the time and material to support a part. This approach is used up to a distance near the actual part at which point the support structure because more dense (i.e. the left side). 

The part was printed in  0.2 mm layers (0.1 mm would have taken a little over twice as long) and it looks pretty good. The bottom didn't look great after the support structure was removed and I continue to wish that they would provide an upgrade path for an additional extruder for water soluble support structures like my Replicator 2X has. That said, this part is buried in the dashboard and won't be seen.

Evaporator Installation

I finally got around to installing the A/C evaporator / heating coil unit. This is complicated because the side impact bars prevent the standard one from fitting. To fit the aftermarket one from Restomod Air I needed to man up and cut a big hole in the monocoque. I took some inspiration from this commercial...

Esmeralda had the kids, so my version involved cranking music to insane levels, playing Foosball beer (actually scotch) pong, tweaking the webbers on the cobra, welding and grinding some steel tubes to keep the car from rocking backwards off the lift and cooking some sous vide short ribs and finishing them off with scotch and blow torch. I did all of this while wearing only my boxers –  yeah, not a pretty picture, but my man card was totally charged up.

The monocoque is 1/4" thick aluminum and Allan recommended that I use Bosch T227D jig saw blades. Eight teeth per inch (TPI) seems way too few for metal, but it's my understanding that the higher TPI blades easily become clogged. I used some cutting fluid and they cut it like butter... well, maybe frozen butter.

I got the Restomod Vapir III to fit, but it was going to a nightmare to get the hoses routed, so I went with a Restomod Bantam. According to Restomod Air even the smaller Bantam has more cooling and heating capacity than the largest Gen IV unit from Vintage Air. I'm not sure about that, but I think that it will certainly be better than the supplied Vintage Air Slimline unit.

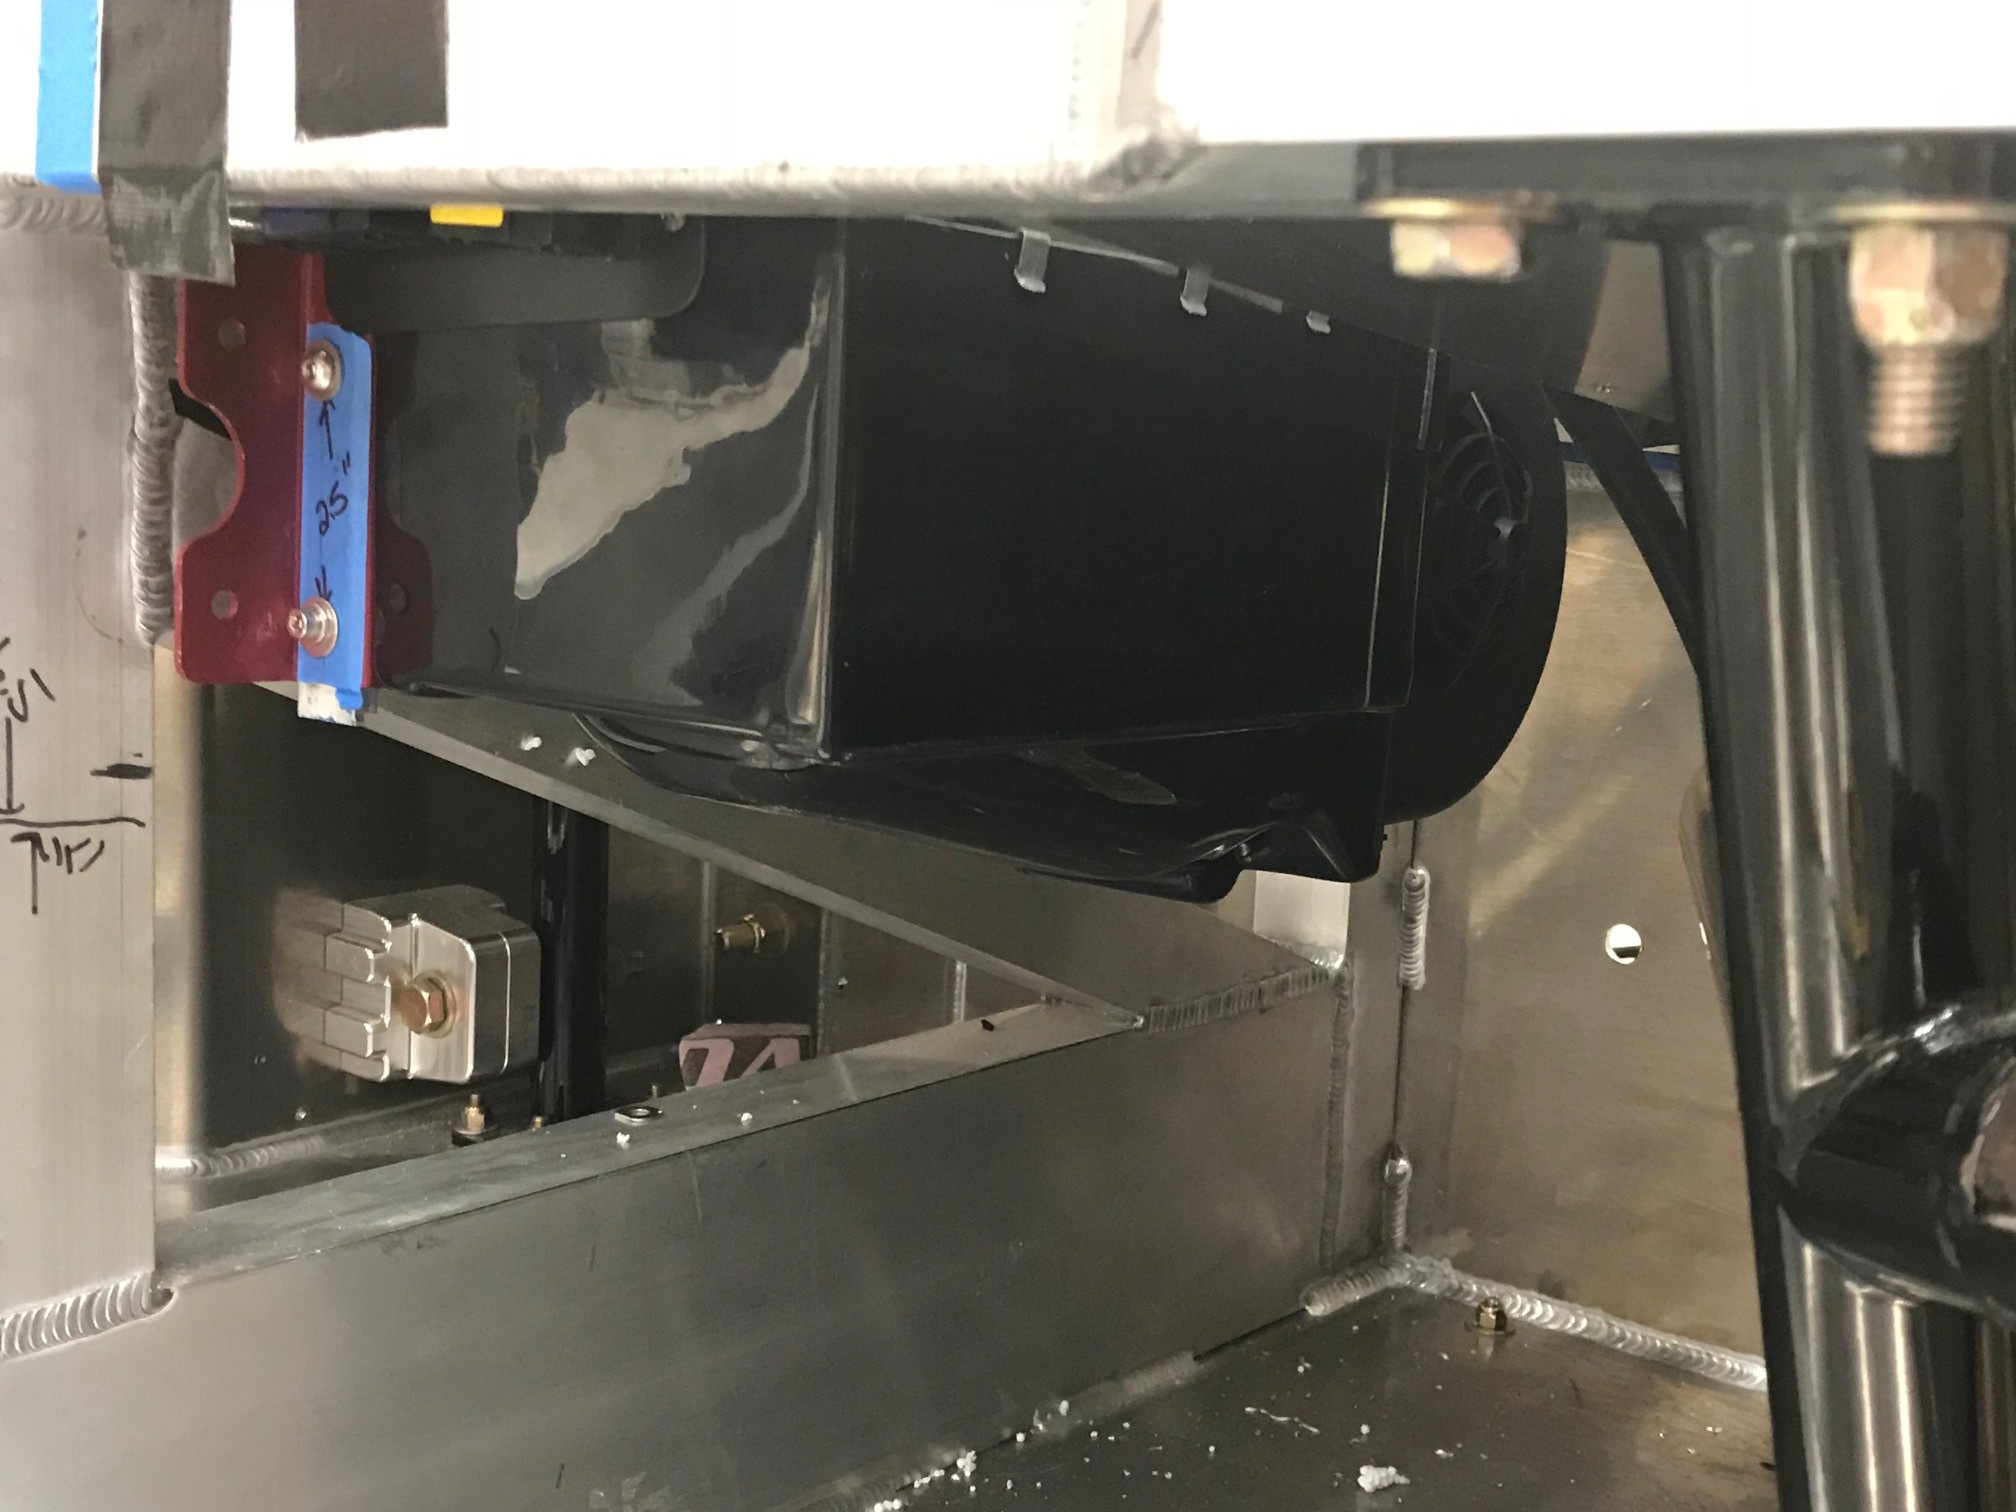
I made some brackets out of right angle aluminum and mounted the unit (I'm not going to trim the brackets until I figure out the exact height of the dashboard). The net result is that the Bantam takes about as much vertical space as the Vintage Air does when it's mounted under the the foot box (i.e., no hole). That said, the Bantam extends further towards the front which leaves less room for your toes to point upward. Keep in mind that when you're sitting flat in the SL-C your toes take more vertical space than your legs!

The blue tape is covering the three dash and two defrost ducts. They point straight up so I will need to cut them off and design and 3D print a manifold to fit under the dash board. The heater dump points down between the two brackets so it will not need to be modified.

The bottom of the evaporater isn't flat. There is 12.5" vertical space between the bottom of the evaporator and the floor at the horizontal cross bar (i.e., directly in front of the passenger). That reduces down to 10" as you move forward. I think Allan measured one of his recent cars to have 10" of clearance. However, the Vintage Air unit doesn't extend nearly as far into the foot box so you have more toe room once you're seated.

The foot box slopes forward at about 7 degrees so the height of hoses from the foot box varies. The bottom of the right angle in the picture below is where I expect the bottom of the dashboard to be.The evaporator projects 3.25" above the footbox at the cross bar and about 5" at the point where it ends in the foot box. The plan is to have the 3D printed manifold directly under the dashboard. The hoses will attach to the manifold directly under the dash board but they will quickly slope down to the top of the foot box for mounting.

I also setup my Precision Mathews PM-25MV milling machine today. IMO it's the best entry-level, bench-top, Chinese mill. It has a variable, brushless 1 HP motor, a three axis DRO and an x-axis power feed. It should handle my needs. I managed to crack the chip shield bracket the first time that I used it. According to the manufacturer, 99.9% of the users remove it so I just 3D printed a replacement bracket to hold the switch and I tossed the rest in the trash.

The next step is to route the hoses.

Shanghaied by a Tick: Part 2

cdc_logo_crop380w.jpg

Part 1 can be found here...

So why is Lyme so poorly understood by the Center for Disease Control (CDC) and the medical community at large? It really boils down to two things: greed and profound silo-based arrogance.

Some doctors and individuals at the CDC have been paid by insurance companies to deny the obvious, thereby condemning tens of thousands of people to misdiagnosis, financial ruin, abuse and wrecked health. Rather than go into a long rant, I'll explain it this way. The CDC's refusal to acknowledge that chronic Lyme exists is as flagrantly dishonest as Trump's most egregious "fake news" claim.  It doesn't matter what the real experts know, what the data proves or what the masses know, it's fake merely because they say it's fake. To my understanding the CDC is a world-class organization, but when it comes to chronic Lyme someone has their hand in someone else's wallet and they have their collective heads in the wrong place. 

If you'd like to understand more about Lyme and, in particular, the political issues with the CDC and the healthcare community you should watch Under Our Skin which is a great documentary on the subject (full disclosure, my parents helped fund it after my mother's awful experience with Lyme).

The CDC has recently recognized Lyme as one of the fastest growing vector borne diseases and they're investing heavily into prevention. While that's a good thing, they continue to damage the prospects for chronic Lyme patients.

BullshitButton-main.jpg
What is “Chronic Lyme”?

In the majority of cases, it [Lyme] is successfully treated with oral antibiotics. Physicians sometimes describe patients who have non-specific symptoms (like fatigue, pain, and joint and muscle aches) after the treatment of Lyme disease as having post-treatment Lyme disease syndrome (PTLDS) or post Lyme disease syndrome (PLDS).
— CDC FAQ

Wow. Antibiotics, and certainly oral ones, are only proven to be effective if the patient is treated soon after they are infected. Once the bacteria is established antibiotics are next to useless, but prolonged use will certainly destroy your health and finances. Borrelia burgdorferi (Bb) is the most complex bacterium known to science. It has five subspecies with more than 100 strains in the USA and 300 strains worldwide. Bb takes three different forms to evade the immune system and antibiotics; the spiral shape (spirochete) that has a cell wall, the cell-wall-deficient form, and the cyst / bio film form. The purpose of conventional antibiotics is to fight against free-floating bacteria. However, once a pathogen creates a biofilm, they are 1,000-times more resistant to antibiotics. The National Institute of Health states that approximately 80 percent of chronic microbial infections are caused by biofilms. Even if patients see improvement from antibiotic treatment, it is common for them to relapse due to the presence of biofilms which helps to explain why chronic Lyme patients remain ill after extensive antibiotic treatment.

Despite the CDC disseminating misinformation, why do otherwise good doctors miss the mark? Well, the Lyme literate know it as "the great imitator" because it can mimic many other chronic disorders and this just doesn't fit the doctors' view of the world. They simply write off people who advocate chronic Lyme as wackos. They'd be much happier placing patients into well established silos that fit the symptoms; arthritis, clinical depression, auto immune disorder, etc., even when it makes no sense. The CDC's utter bullshit regarding chronic Lyme reinforces this approach.

For example, I worked with one woman in her thirties. A total workaholic who in a matter of weeks had joint pain so bad she couldn't pick up her children and she often had to take pain killers just to drive home. She was reputedly diagnosed with arthritis. After six months and multiple doctors she was correctly diagnosed with Lyme. Really? This was recent and those were Boston-based doctors and acute joint pain is probably tied with chronic fatigue as the top Lyme symptom. 

Lyme's impact on the Energizer Bunny

Lyme's impact on the Energizer Bunny

Another friend used to run at least eight miles before breakfast, work a full-time job and before going to bed he'd build things. He built his house, he built a plane (that he flew), and he's built a bunch of cars including seventeen SL-Cs (I'm trying to finish my first). You know, the Energizer Bunny type who makes you question what you've done today.

He got sick and in three weeks he needed to take a nap in the middle of the day and be in bed by 8:30 PM. Other symptoms include: chronic hives all over his body, sore joints, heart beat skipping, muscle pain (like he used to feel the day after running a marathon), facial twitching, ringing in ears, etc. Yeah, he's a train wreck and after spending five years meeting with every sort of specialist they diagnosed him some form of autoimmune disorder. He has a P.H.D. in biology and he read everything about that diagnosis. He kept telling them that that it made no sense and that he thought that he had Lyme. He lives in Connecticut and both his dog and neighbor had Lyme, so his theory doesn't require an advanced degree. They put him in a convenient silo and condemned him there for life. I was recently able to get him in front of the right doctors and they confirmed that he has Lyme in his spinal column and he is currently in phase two of a brutal treatment protocol.

Syphilis spirochetes, they look a lot like Borrelia (aka Lyme) spirochetes

Syphilis spirochetes, they look a lot like Borrelia (aka Lyme) spirochetes

These experiences aren't outliers. Everyone that I've met with chronic Lyme has a similar story which ranges from repeated misdiagnosis to outright abuse. Perhaps you're thinking that I'm being too hard on the healthcare system and that they should get a pass because it's the only disease that breaks their vaunted silos. WRONG!

Person with tertiary (gummatous) syphilis. Bust in Musée de l'Homme, Paris.

Person with tertiary (gummatous) syphilis. Bust in Musée de l'Homme, Paris.

They have failed to understand the obvious, and well documented similarities between Lyme and Syphilis. To my layperson's understanding, the primary difference between Syphilis and Lyme is that the former is a Sexually Transmitted Disease (STD) and the latter is a tick-borne infection. A second and very unfortunate difference is that there are excellent diagnostic tests for Syphilis whereas the ones for Lyme only detect a few of the Lyme variants and even then there are many false negatives. Finally, late stage Syphilis is often more catastrophic than Lyme; gross disfigurement, insanity, death, etc.

Beyond those differences, they both feature spirochetes, they both have three stages (although the CDC denies that the third stage exists for Lyme) and they are both known as "The Great Imitator" because they can mimic almost any medical condition in the textbooks, including major psychiatric disorders. The imitator has great range, Beethoven went deaf due to syphilis and it killed Bram Stoker, author of Dracula.

In fact medical students in the USA used to be (and perhaps still are) taught that they should always consider neurosyphilis as a potential cause for atypical behavioral and psychiatric symptoms because late neurosyphilis can be difficult to diagnose and typically occurs 4 to 25 years after the initial infection! While you don't hear about syphilis in the west very often, Wikipedia states that in 2015 about 45.4 million people were infected with it and it caused about 107,000 deaths. Other than greed and profound silo-based arrogance, it's inconceivable that the medical community readily accepts chronic Syphilis and it's ability to mimic other diseases, but calls chronic Lyme patients as wackos for insisting that it exists and that it can manifest in a wide variety of illnesses.

lyme-disease-alzheimers.jpg

OK, back to my story... I was fortunate to get an appointment at The Dean Center for Tick Borne Illness. They looked at my previous test results and gave me a bunch of neurological tests. The most interesting went something like this: stand, stand on one foot, the other foot... why am I doing this? Then, stand on one foot with your eyes closed... holy shit, if the doctor hadn't been standing next to me I would have hit the floor. Apparently one of the places that Lyme likes to live in the fluid in the ear which is why many patients have tinnitus or balance issues. They took a lot of blood. I think it was 18 vials, but that stuff makes feel nauseous so I wasn't looking and I certainly wasn't counting. They then strongly recommended that I go the St. George Klinik in Germany for two and a half weeks of treatment.

Now some of you highly-educated doctors might think that I met with some wacko alternative medicine person. You types usually want to know the person's credentials so you can summarily dismiss them. Well my doctor is an attending physician at Harvard Medical School and has dedicated her life to study of tick borne illness. That doesn't make her ipso facto correct, but she likely has a higher cred factor on Lyme than you ever will.

Why do I need to go to Germany? Boston is the healthcare capital of the world and I'm sitting with the best doctor in the best facility for Lyme in the city. It's pretty simple, the treatments in the USA are not very effective for chronic Lyme. In fact, they won't be covered by insurance and they will likely wreck your health. Remember according to the CDC the condition doesn't exist! The treatments in Germany are effective, but they would cause a USA-doctor to lose their license. So off to Germany I went.

Breakfast of champions

While St. George has a robust three-week protocol, the primary parts are: (1) hypothermia therapy, (2) intravenous ozone therapy, (3) intravenous antibiotics, (4) detox, (5) nutrients and (6) diet. One of the first things they do is install a "port" into your arm which enables them to give you infusions. I have good veins so this wasn't a big deal and mine lasted the whole two weeks. You're pretty much hooked up to these things all day.

Most patients receive two full-body hypothermia treatments. Since you'll be sedated for six hours they give you vegetable broth for dinner and nothing for breakfast. Early the next morning they sedate you and over a two-hour period they raise your entire body to 107.2 °F. They hold you at that temperature for two hours at which point they cool you down over a third two-hour period. I'm no doctor, but a quick Google indicates that you can die at 108 °F which is why all of this is done in an Intensive Care Unit (ICU). They've done it in excess of 15,000 times over the last 20+ years, so they know what they're doing. The treatment is covered by insurance in Germany!

Julius Wagner-Jauregg

Julius Wagner-Jauregg

Now you may be thinking, like most USA-based doctors, that this is some treatment invented by Lyme wackos, but there is medical precedence and science behind the treatment. Firstly, everyone should understand that when you get sick your body creates a fever to cook pathogens. Secondly, Julius Wagner-Jauregg took this "fever-is-good" approach to the next level when he won the Nobel Prize in Physiology or Medicine in 1927 "for his discovery of the therapeutic value of malaria inoculation in the treatment of dementia paralytica." In short, he used the blood from a soldier with malaria to infect three of his neurosyphilis patients with malaria. The good news was that the resulting high fever killed the syphilis bacterium. The bad news was that they now had malaria.

Thirdly, according to the St. George Klinik, in vitro cultivation of Borrelia burgdorferi (B.b.) demonstrates that the spirochete replicates most quickly at 37 °C (98.6 °F) making the human body the perfect incubator. If the temperature is increased to 39°C (102.2 °F) the growth of B.b. is significantly impeded. At 41 °C (105.8 °F) all spirochetes in the culture are killed after 24 hours, whereas at 41.6 °C (106.9 °F) all spirochetes are killed after two hours. They also claim that the intravenous antibiotics are 16 times more effective at that temperature. That's the science behind the hypothermia treatment. Of course all of this makes me think of the time vs. temperature pasteurization tables that I use when cooking Sous Vide.

Unfortunately, they couldn't do the whole body hypothermia on me because of my heart, so they gave me a special local hypothermia on my head. I walked into the allotted room dragging my IV stand. The nurse swapped my clear IV bottle for a new one with nasty looking yellowish liquid...

"What's that for?", I asked.

"To keep your brain from swelling too much."

"Why do I need that?

"We're going to heat your head up."

"How hot?"

"44.5", she replied. I know that 100 is boiling, so that sounded hot, but I don't comprehend Celsius so I looked it up on my iPhone. That's 112.1 degrees Fahrenheit!!!

"Isn't that dangerous?", I asked.

"Ya, ve know what we're doing."

Where's that calming gel? This has to be easier that getting three shots to the eye, right? There was a machine about as tall as I am with lots of buttons, dials and LED readouts and cables that led to an articulated arm hanging over the table. It looked like something from the set of The Six Million Dollar Man - high tech, but dated (not worn, just not state of the art electronics). As instructed, I took off metal items and I laid down on the table and rolled on my side. The nurse carefully positioned the business end of the arm on the back half of the side of my head such that it covered half of my ear. She then gave me a horn and told me to squeeze it if things got too hot. At first I didn't feel much, but I started to profusely sweat, especially on my head. At some point the skin directly under the contact area with the machine started to burn and then burn really bad.... "HONK!". 

food-drink-dragon-cook-microwave-microwaving-metals-shl080925_low.jpg

The nurse came in and said something like "Wow, you're sweating a lot." When I told her that the machine was burning me she removed it and let me feel the part that was in contact with my head. It was cool and felt like a gel pack. She explained that cool water was being pumped through that part and that the burning that I felt was electromagnetic waves interacting with the impurities in my sweat.

Wait a second... I had a flashback to a Christmas morning in the 70's when my dad surprised the family a microwave. It was the first one in the neighborhood and it was so cutting edge that my father actually consulted the manual and the number one takeaway was to not put any metal in it. There was a multi-generational debate with my grandparents weather or not it was safe to stare through the window when it was running... Jimmy you used to look at your toes in the X-Ray machine at the shoe store until they figured out that wasn't a good idea. However, it went without saying you weren't to stick your head in it! 

Stay tuned for Part 3...

Alternative Alternator

electricity-12.jpg

My SL-C will draw a lot of current for a home-built car. This is primarily due to lots of cooling fans (two for the radiator, one for the intercooler's heat exchanger, one for the engine oil cooler, and one for the transaxle cooler) plus lots of extras like the dynamic wing, linear actuators for the adjustable sway bars, etc.

I'm also planning on using a cutting-edge Lithium-Ion battery, the Antigravity ATX-20. I saw it in their booth at the SEMA show and picked it up. "This is a fake, right?", I asked. "Nope, that's the real thing," was the reply. !@%#! that's light. It has some has some really impressive specs:

  • Weight: 4 lbs 11 oz (2.13 Kg)
  • Size: 6.875" x 3.440"  x 6.125" (mm: 175 x 87 x 156)
  • Cranking Amps: 780
  • Amp Hours (pb Eq): 25

Given that the engine is supercharged, the compression ratio is only 9:1 vs. the stock 11:1. Therefore the 780 cranking amps should be enough to start the car. However, the battery is only rated at 25 amp hours and, from what I can gather, an average car battery has around 70 amp hours. So, I need to have a really good alternator that generates lots of current at low RPMs.

An alternator is a generator that's driven off of a belt or serpentine connected to the crankshaft pulley. So why don't the just call it a generator? I think it's because cars run off of direct current (DC) and a generator creates alternating current (AC) which is then rectified into 12v DC. 

Current plan... subject to change

Unfortunately my engine doesn't currently accommodate an alternator or an air conditioning compressor, so I've been pulling my hair about that. In the diagram to the right you can see where I'm thinking about placing these pieces which will require custom brackets!

Since it's an LS engine I wanted to go with an alternator with a General Motors (GM) bolt pattern. I chose the CS-130 style rather than the older and larger CS-144 style because space is at a huge premium in an SL-C – think Manhattan penthouse across the street from Central Park.

Once I had decided on the CS-130, I had to pick one of the hundreds if not thousands to choose from. My biggest concern is idling in traffic on a hot day which causes two issues from an electrical system perspective; (1) all of the power hungry fans will be running at full speed and (2) low RPMs typically means low power generation and even though the engine generates 1,000 HP it idles like a kitten at 650 RPM which is low. As I already mentioned the Antigravity battery has low amp hours, so a "normal" alternator isn't going to work for me.

After doing a lot of research, I found Mechman Alternators. They custom make alternators with really impressive low RPM output as demonstrated in this video.

Mechman's Elite & S Series have the following advantages:

  • Six-phase hairpin stators: provide incredible efficiency resulting in extremely high output at low engine RPM, less energy wasted in the form of heat, and more horsepower to the wheels.
  • Precision balanced low-mass rotors: allows shaft speeds of 20,000+ RPM.
  • High Pole Count: results in less electromagnetic interference with electronics.
  • Twin internal rectifier plates: most other high-performance alternators have only one rectifier with six diodes, theirs boast 12 press fit-diodes with 300% more surface area to dissipate heat. This results in cleaner power and better durability.
  • Twin high efficiency cooling fans: excellent airflow.

Perhaps most surprising to me is that these are one-wire rather than three-wire alternators. One-wire alternators are easier to wire, but they typically have poor, and sometimes zero, power generation at low RPMs.

I went with model B8165170M with a 54 mm pulley. It has a billet aluminum case and is rated at 170 amps. However, what's really impressive is that it will generate 120 to 130 amps even at my low idle! I just got it today, and it's beautiful. I went with the "machined" finish because that's in keeping with all of the CNC'd suspension parts. Now I just need to figure out how to mount it.

Shanghaied by a Tick: Part 1

It's been a long time since my last post. Beyond procrastination and copiously chasing my tail on the project, I've been busy dealing with a lot of health issues. If you're wondering why I'm blogging about Lyme on a garage-oriented site, it pretty simple. I need to be alive and have the energy to finish the car. Secondly, I've become a bit of a Lyme advocate and this is the best way for me to tell my story, at least for now.

While I'm man enough to admit that part of the reason for my positive outcome was due to persistent, unsolicited input from my wife and mother, I'd like to be 100% clear that such admission isn't an open invitation to layout coordinated outfits, comment on when I should cut my hair or to reiterate that you don't like the "moving fin thing" (i.e., dynamic wing discussed in this post) on the back of the car.

There's a basic lesson here for all of you proud "man card" carriers out there – if you're getting tag teamed on health issues, you might want to listen. Women, if the man isn't listening fire up a team.

tt.png

It all started with a vein popping under my left cornea causing me to lose almost all my vision in that eye. During my vision test I could see the wall and just one small corner of the eye chart poster. Other than that, I couldn't even tell that there was a poster on the wall. They fixed that with three shots to the eyeball, each a month apart. I have a needle phobia and they don't knock you out, so that wasn't a lot of fun. They do a couple of applications of dilation drops, then a couple of applications of numbing gel, and then a couple of applications of cleansing gel. After that they tilt your head back and put a metal clip to keep your eyelid open – that started kicking my flight response into gear and I asked "I'm getting the shot now?" The doctor with the bow tie simply responded, "Yes."

Post shot eye

Post shot eye

Where's the calming gel? Nope, pull out the man card and sit still. WTF, they're prescribing opioids by the ton and they're dispensing marijuana a quarter mile from the high school, but there's no calming gel? They need to work on that protocol. It wasn't nearly as bad as my mind imagined and, as the doctor had told me, the burning after the numbing gel wore was much worst than the actual injection. In any event, my sight was mostly restored and I’ve since discovered that the issue is caused by a rare genetic defect, Pseudoxanthoma elasticum (PXE).

So what does this have to do with a tick? Hang on, I'll get there...

Ejection Fraction

Although the doctors were certain that the issue with my eye had nothing to do with cardiovascular issues, my mother didn't care and she forced me to get a nuclear MRI at a research facility run by a family friend. They stick you in a tube for two hours and inject you with something that places stress on the heart and makes you feel like your peeing – who invents this stuff? They indicated that "the study is 100% at your discretion and if you start to get claustrophobic just squeeze this ball and we'll take you right out." Ha, my mom will send me back so no matter what don't take me out. I’m in my 50’s and mom still makes me do things I don’t want to do. A couple of days later they told me to come back to the hospital where they explained that my Ejection Fraction was 26%. Normal is 55% or higher and anything under 36% is bad and you're deemed to be in heart failure.

So, what caused that? Surely my years of stress running a company combined with not eating properly and not exercising properly. Nope, my cholesterol was fine, my arteries were clear, I don't smoke, I don't do drugs, I don't drink too much (except on vacation), so they diagnosed me as having cardiomyopathy, which is doctor speak for they don't have a clue what caused the problem. Their best guess was that "some virus" wacked me and they prescribed me some drugs, but they didn't do much to figure out what had caused the problem. The challenge is that if the drugs don't work to remodel the heart and the heart gets worst, the only surgical option would be a heart transplant. While I understand that's not a moon shot these days, it's not on my bucket list! 

So my mother repeatedly suggested that I see a leading "functional medicine" doctor. Unlike most doctors who operate in a very tall and narrow silo, a functional doctor looks at the big picture. He told me that the medication that the other doctors prescribed were "mopping up the water on the floor" and that we needed to "figure out what was plugging the sink." Apparently functional doctors can have functional conversations with their patients.

They took a lot of blood and I filled out some long forms with a lot of personal questions which you’d rather not answer. I’ve been an adult for a long time, but I don’t like talking about my poop, masturbation habits or a lot of other topics. One would think that there was nothing left unanswered, but he asked if there was anything that wasn’t covered. I mentioned that I run hot and sweat a lot. On some nights I soak multiple pillows and need to change my shirt. This was a point of long-term martial stress because my wife would need to buy new pillows and we have a lot of pillows.

Borrelia spirochetes

Borrelia spirochetes

He then declared, "I think you have Lyme." I insisted that I didn't and he asked me what made me think that. My mother had Lyme and I didn't have any of the symptoms; achy joints or crippling fatigue (FYI, Lyme has more than 100 symptoms). He then explained that I perfectly described babesiosis, a common Lyme co-infection. It’s a blood parasite that's very similar to malaria. If You Think Lyme is Bad, Meet Babesia! does a great job explaining it. I recognized a bunch of symptoms described in that article and in particular the description of one of her patients who had a “hot flash” so severe that it fogged up the front windshield of the car. In fact, I pretty much exactly described that in my Human Heater blog post well before I knew I had Lyme:

I have an amazing ability to steam up a car. I’m not sure what the hell the issue is, but it starts at the window nearest me and migrates out in a radial pattern.

Good thing I'm not a woman or the average doctor would have told me that I was just going through menopause! 

It's important  to understand that if you're in the United States, get bitten by an infected tick and you notice the classic bull's-eye rash the medical community will treat it with antibiotics and you'll very likely be cured. However, if you don't detect it early and Lyme becomes chronic, the treatment you'll get from the vast majority of the doctors in America is FUBAR (Fucked Up Beyond All Repair), I was going to use Fouled, but the nasty word is appropriate. Many don't believe in chronic Lyme and if they treat you at all they will likely wreck both your health and finances. I would put as much faith in the majority of their views as I would a tweet from Trump at 2:30 AM in response to some perceived slight. Their views are as arrogant, misinformed and as destructive as anything I've seen from that megalomaniac.

A recent study by Tulane University exposed ten primates were exposed to ticks carrying B. burgdorferi spirochetes. Half received treatment with 28 days of oral doxycycline. Some key takeaways;

  • All subjects treated with antibiotics were found to have some level of infection 12 months post treatment.

  • Despite testing negative by antibody tests for Lyme disease, two of 10 subjects were still infected with Lyme bacteria in heart and bladder.

  • Few subjects displayed a rash. Although all subjects were infected, only one of the 10 displayed the classical bulls-eye rash. The subject that developed this rash, interestingly, never mounted an immune response to five borrelia antigens throughout the study period, prior to and following treatment.

Part 2 can be found here...

Dance Floor

The dancing wing that I videoed in the last blog post will generate over 800 pounds of force which will crack the body. So, I need to design and build a stable dance floor. With the event of CAD, not all work on the car needs to be done in the garage so I took some photographs and quick measurements before I left for vacation.

Fortunately the rear suspension cross brace, per the SCCA rule book, is made of 1.5" x  0.125" wall Drawn Over Mandrel (DOM) steel tube which is perfect for welding brackets. The two design priorities are strength and adjustablility. Oh yeah, and it must look cool... my wing deserves just as nice a floor as Travlota had, but I think I'll skip the lights.

Mounting plate & cover

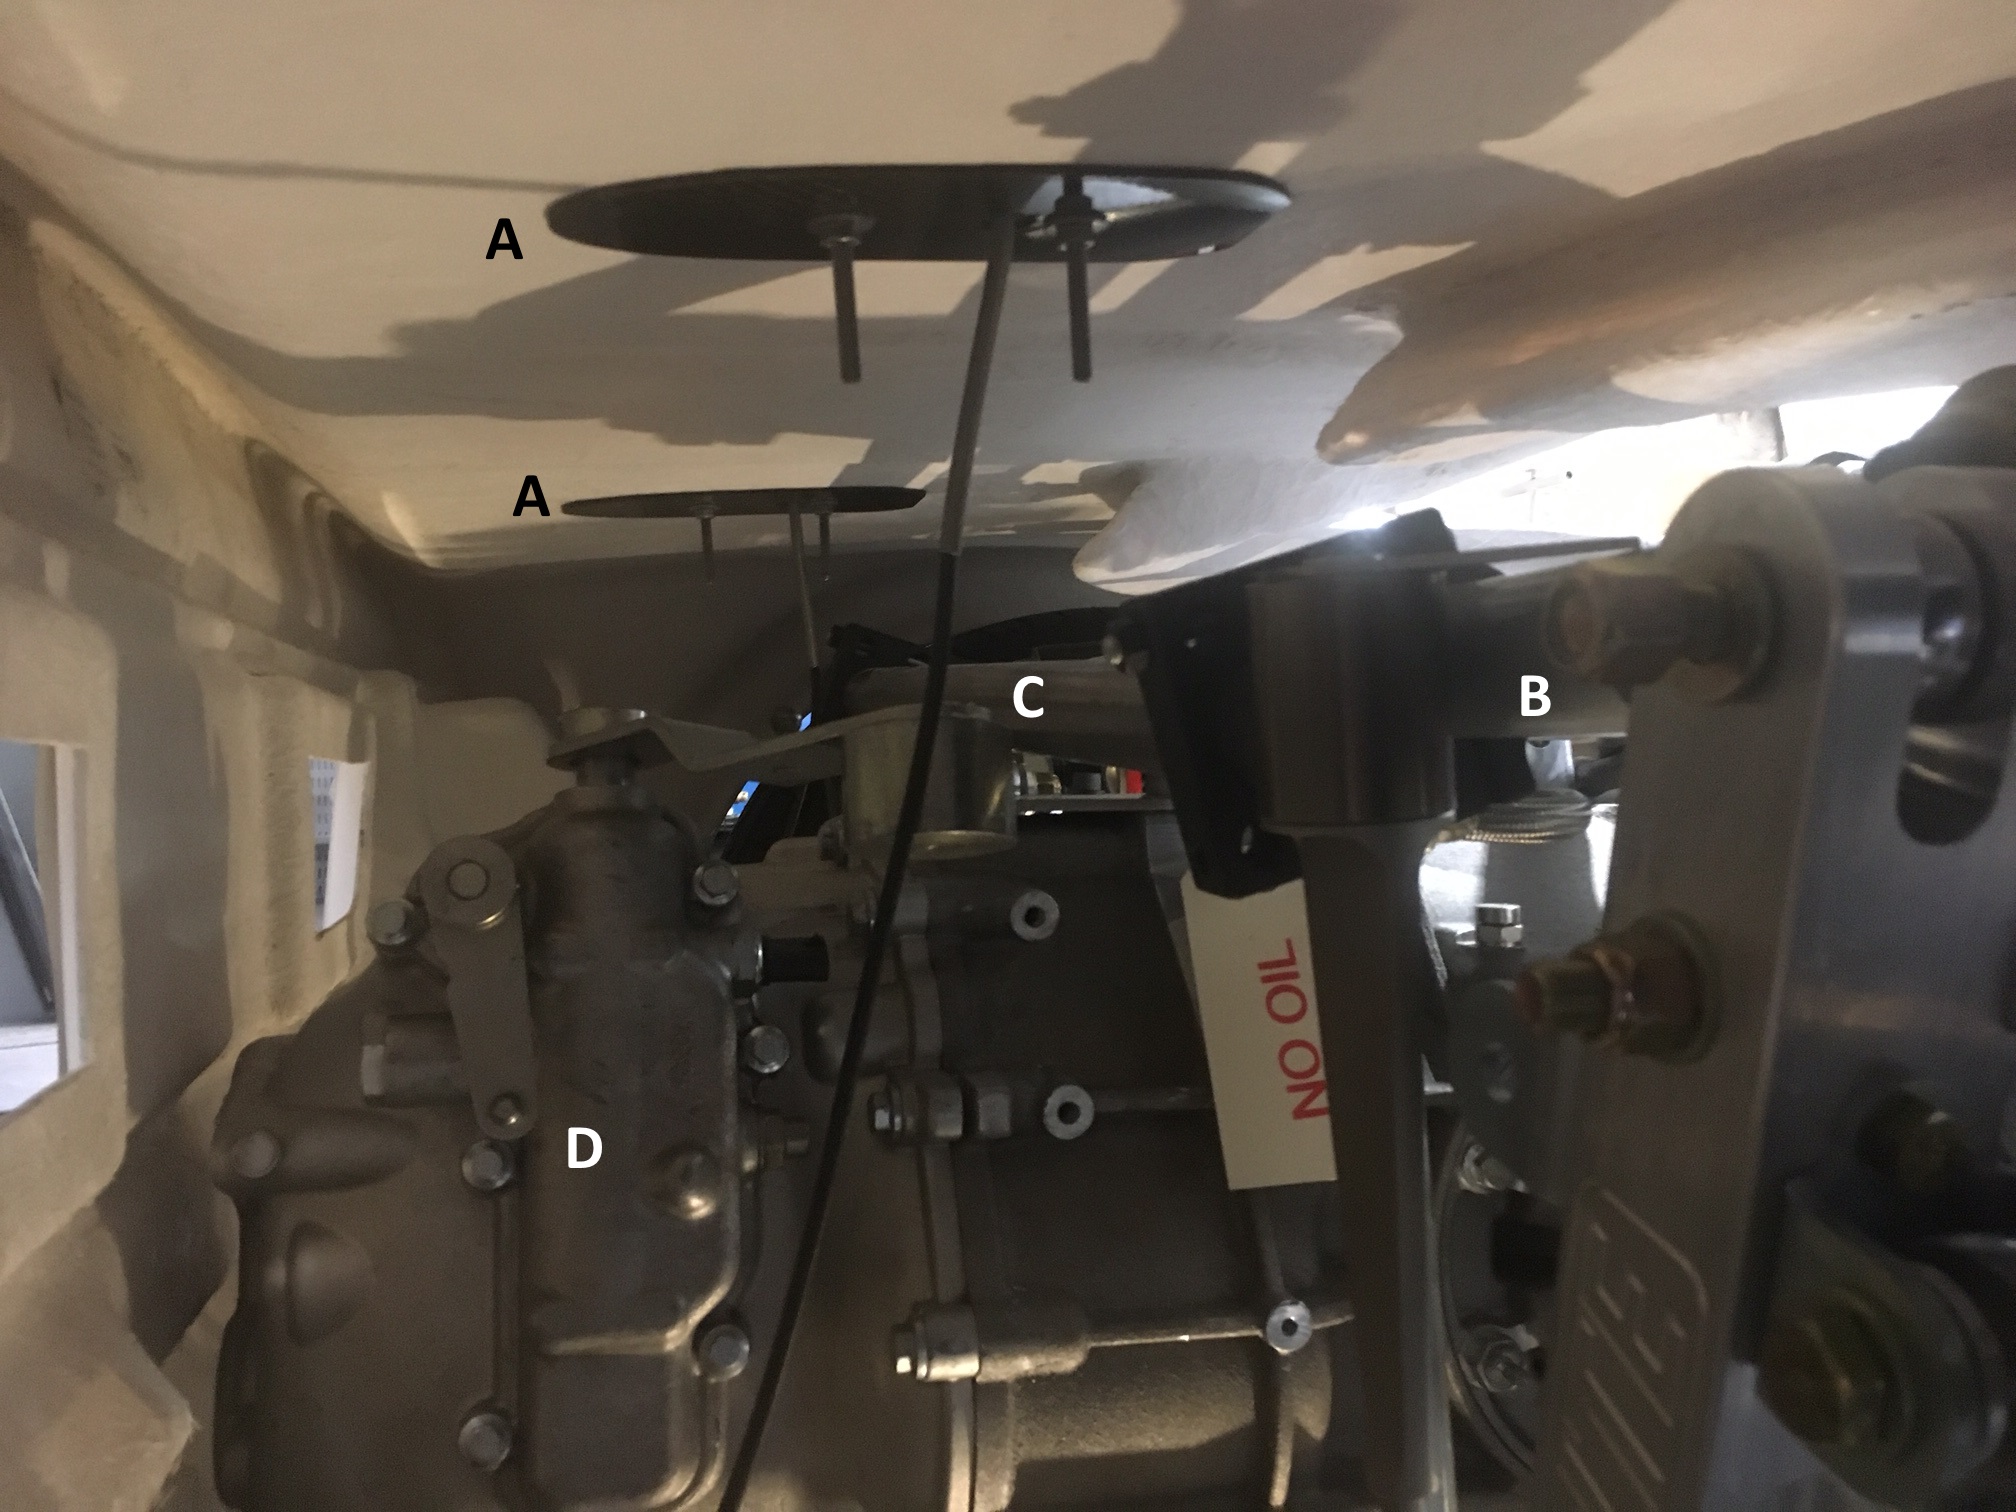
The lights built into garage floor really paid off in the picture above. The relevant parts are as follows: (A) the carbon fiber backing plates included with the wing (the long studs will be cut once the bracket is finalized), (B) the rear most tube in the rear suspension cross brace, (C) the rear sway bar (must have been drinking, because it's crooked there), and (D) the monster Ricardo transaxle.

The first piece is a mounting plate that replaces the provided carbon fiber one. It will be made of ¼" aluminum and will be bonded to the bottom of the tail. A removable cover (shown in red) with the same profile will be made of thin aluminum or stainless steel. The sole purpose of the cover is to hold the power pod wire in place.

The second piece is the bracket that will be welded. The side pieces will be made from¼" steel (that might be thicker than I need) and the cross piece will be ⅜" steel with a ⅜" threaded hole in the middle. It will be TIG welded by someone who knows what they's doing. I could MIG weld it and it would be more than strong enough, but that would violate the "cool" criteria because my welds are ugly!

Wing support bracket

Wing support bracket

Height Adjuster

The third piece is is the height adjuster. It's made by welding a ⅜" hex held bolt to a ¼" thick by 1.5" diameter steel disk. It's topped off with a piece of hard (i.e., 70A durometer) rubber.  A ⅜" bolt seems small, but the force is 100% in compression with no shear and even a Grade 5 has a minimum tensile strength of 9,300 pounds. The adjuster is spun into the wing support bracket until the desired height and then a⅜" nlyoc is used to lock everything in place.

Rear sway bar bracket

The fourth assembly is used to hold the rear suspension sway bar. It's made from a piece of 1/8" bent 1/8" and a custom pillow block machined from aluminum. It's shown here because the wing support brackets must clear the sway bar and all of the brackets are welded to the same tube in the rear suspension cross brace. It would look cleaner to combine the two brackets, but the wing supports are driven by the location of the power pods and the sway bar pillow blocks should be spread as wide as possible. When I get home I'll take some careful measurements, but for now it looks like they'll be separate.

This is what it looks like with all of the pieces put together. I don't have precise measurements, but this is a good first cut.

For some reason it appears in the viewer upside down. You can click, hold and drag the left mouse button to rotate and use the mouse wheel to zoom in/out... it's pretty intative.

Dance the Night Away

I had been waiting for a my dynamic split wing for months and the day that is was going to be delivered I was headed off for vacation... that's about the same as telling a five year old on Christmas Eve that his presents will be waiting for him when he returns a month later. Imagine my disappointment when I had to fly home for an urgent meeting. My wife wanted to know if it could be done via a video call... nope, absolutely not, it must be done in person. She knows better, but she let me slide because the biggest child in the house is prone to temper tantrums LOL

The wing is well engineered and built to a high standard. It  comes with good instructions and is straight forward to put together. The only hiccup was that that the Main Pivot Shaft wouldn't fit into the bushings where the wing halves meet. I popped the bushings out and I needed to use a rubber mallet to get them mounted on the shaft. Now way was the shaft going to rotate in the bushings. Fortunately the sanding drum on the Dremel was a perfect fit and running it in and out of the bushing fives times or so solved the issue. Fortunately, he bushings in the pivot boxes where a perfect fit.

As can be seen in the video below, when the ECU first powers up it cycles the wing through its four modes: low-speed cornering, high-speed cornering, straight, and braking. You can tune the angle of attack for each mode and save up to 10 different configurations for different conditions or tracks. The ECU uses the Vehicle Speed Sensor (VSS) from the CAN Bus and its built in accelerometers to determine what mode to put the wing in when driving.

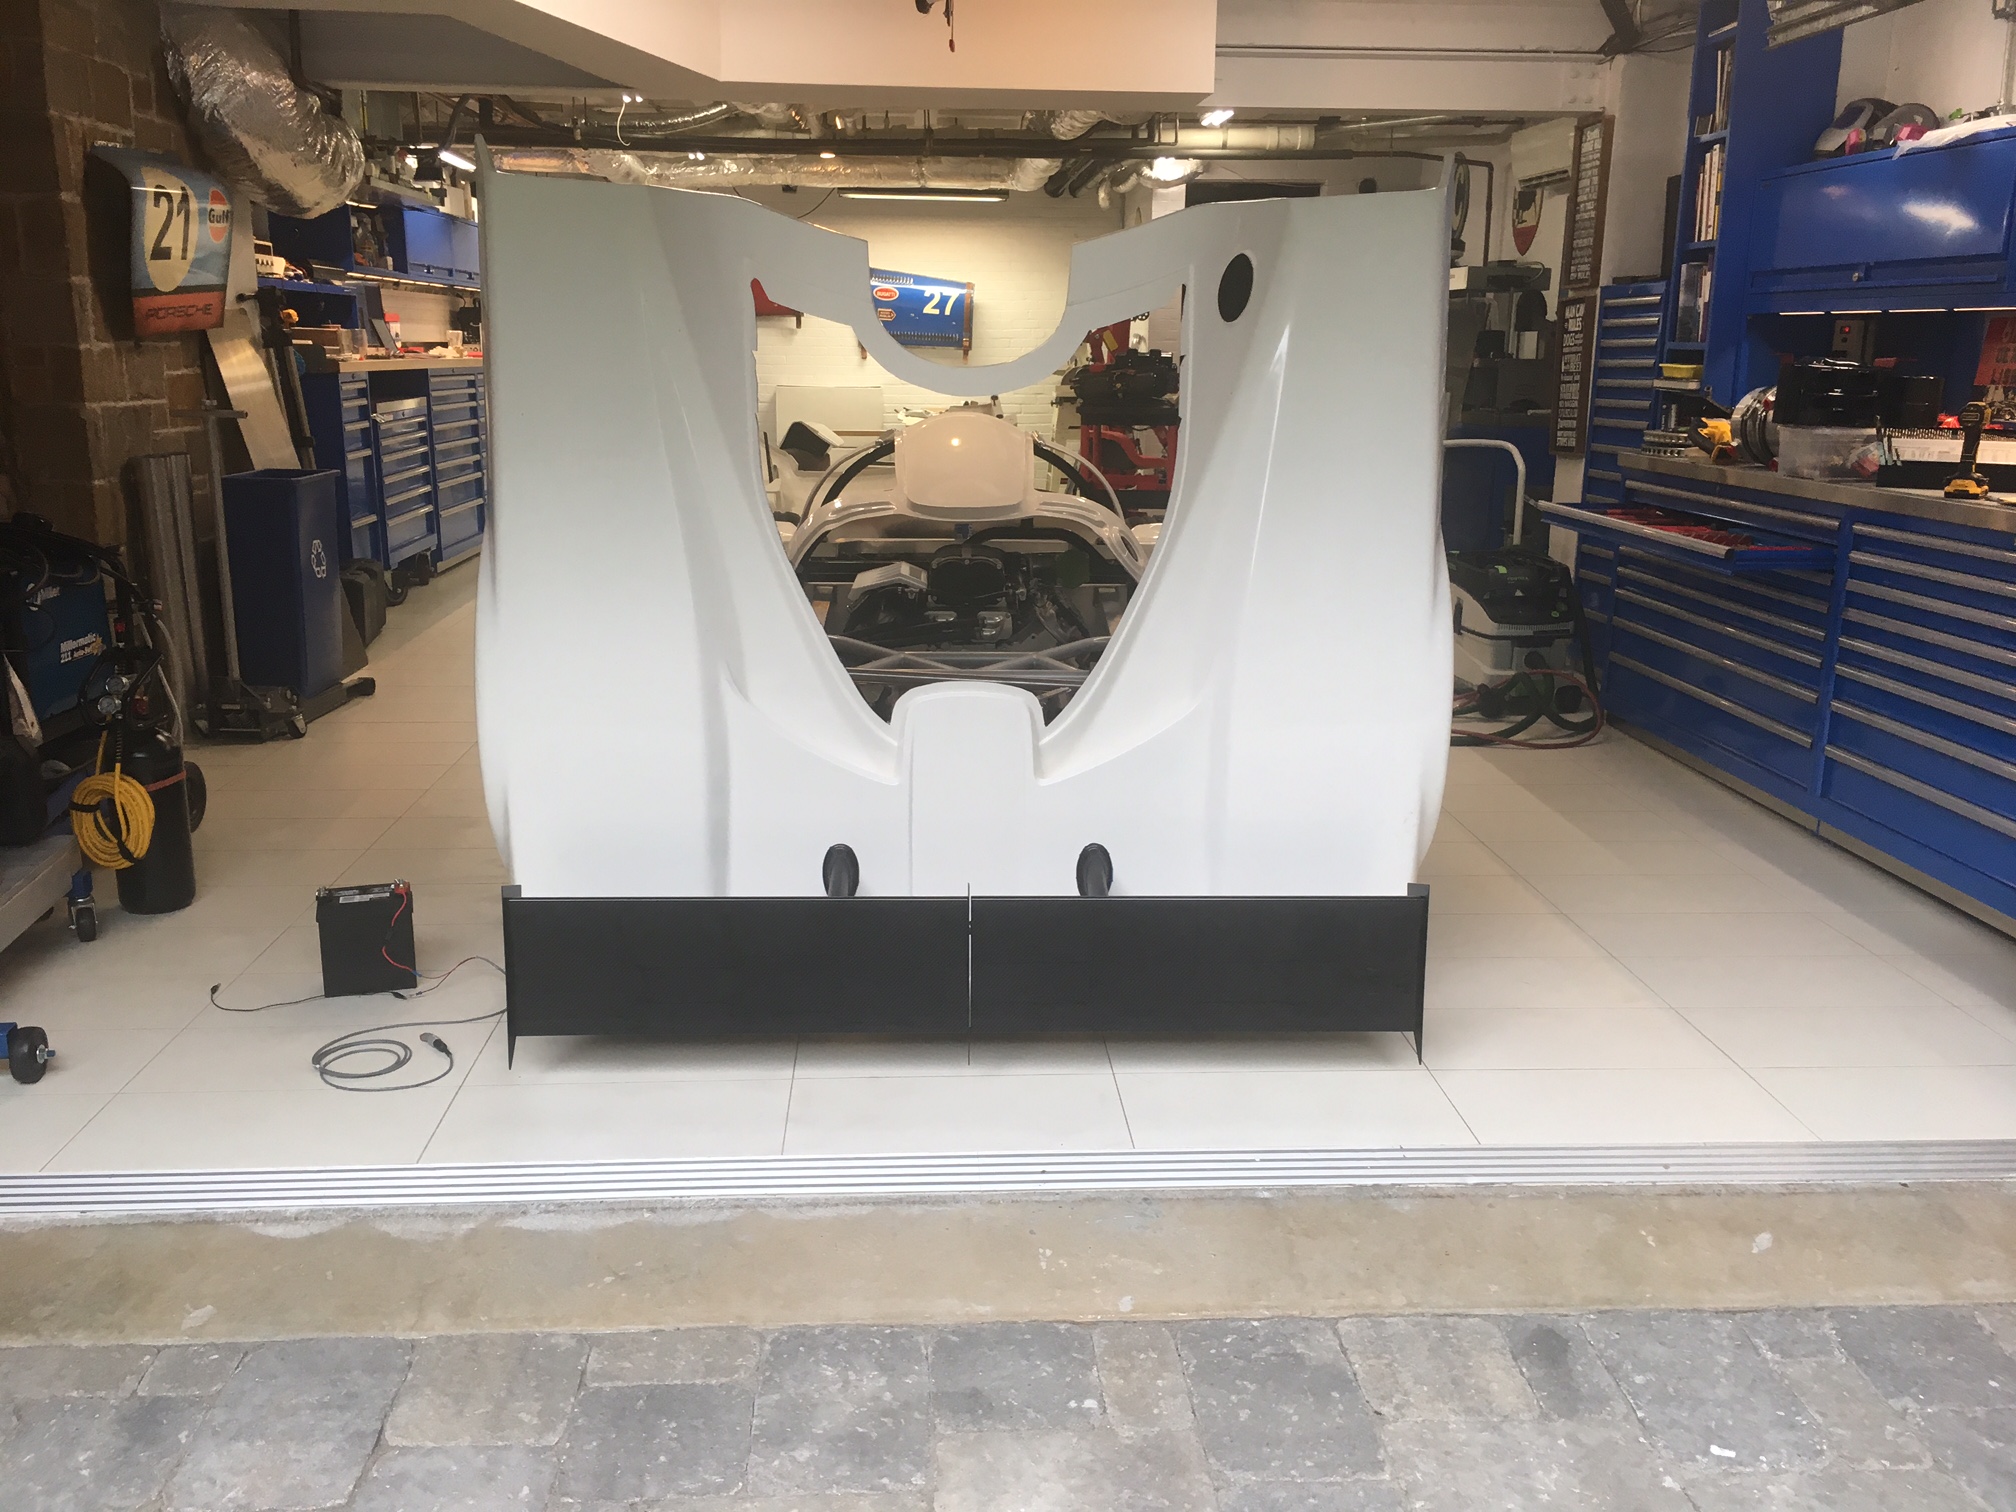
All of the actuators and motor controllers are in the power pods (i.e., the tear dropped vertical uprights) which also act as heat sinks. So nothing other than the ECU goes inside the car which makes for a very clean install on a mid-engine car. Each pod requires three holes, two for the mounting studs and one for the connection to the ECU. At this point the wing is only mounted to the fiberglass using the provided carbon fiber back plates. I will need to design a custom solution to transmit the downforce directly to the chassis because the wing generates over 800 pounds of force at 200 mph.

As can be seen in the photos below the tail now opens a full 90 degrees... that took a lot more grinding! 

More Grinding

The tail used to open a full 90 degrees. When I went to open it after installing the monster Ricardo transaxle, it would only open 30 degrees because it hit the underside of the transaxle as it rotated. Not a big deal because it's on the bottom and not visible. So I took the tail off and notched the fiberglass – twice, to get it right. That allowed the tail to open wider, up until it ran into the steel tube used to mount the pivot points...

So I pulled out the grinder. As you might recall, I became a world-class grinder when cleaning up all of the welds on my audio stand project. So far, I've taken the tail off five times to grind more. It looks like it has 3/16" walls, so it's pretty thick and the bottom of the transaxle is asymmetrical. At this point I've ground the bar halfway through and it opens about 70 degrees.

In the picture to the left, you can see where the bar is hitting the underside of the transaxle (down arrow). I need to continue to remove material until the bar is able to rotate enough to rest on the brace (up arrow). This will significantly weaken the tube and I am considering removing the tube, cutting out the middle section and welding in a new piece. I need to think about it a little ;-) 

Dashboard

I wanted to fit the dashboard so that I could check how much space I could gain for the evaporator when I cut a hole in the monocoque. The first step was to trim the ends to clear the front roll hoop. The dash has molded lines so this was a simple task. The Snap-on reciprocating tool was used to cut the corners and the the jig saw was used everywhere else because it's easier to maintain a straight line.

Stalk on the left and new switch on the right

I then dropped the dashboard in. Holy crap... despite the car being wide, the cockpit is extremely cramped... just like a race car should be. The right stalk on the on the steering column projects in front of the middle binnacle where the controls and/or a tablet will go. In addition, the stalk has a large number of windshield wiper settings and the wiper motor only has two speeds. The solution is to replace it with a smaller 80173 switch from Painless Performance.

The stalk was very easy to remove once I figured out how it was done. There are two recessed tabs, one the top and one on the bottom. You simply depress the top one with a a flat screw driver and the bottom one with your finger and pull. Separating it from the wiring harness was also easy; cut one wire tie and pop off one reusable wire clamp.

The next challenge was figuring out how to mount the switch. My first attempt was to 3D print two round pieces that sandwiched the switch around the steering column's upper and lower plastic covers. While it was easy to make the parts, it's a pain in the ass to install the switch and I will have the covers on and off a bunch of times during the build.

There's a reason the OEM version is mounted to the steering column, so that's what I decided to do. In the end it was a lot more difficult than I first thought - first time that's happened on this project LOL. The most challenging parts were the two clips (I'd like to thank GM for making them different shapes) and figuring out the exact position switch which requires a compound plane. I printed it in two pieces; the main box and a cover which completely hides the shaft and nuts.

The following pictures show the assembled module. I thought about designing clips to hold the cover in place, but after the first two clips I am done with clips for a while and the screws and nylocs work just as well.

As can be seen above, the switch protrudes through the side of 3D box. This requires a little material to be removed from the plastic receiver on the steering column. This is easily achieved with a sanding drum on a Dremel. The spade connectors also need to be cut shorter to fit. The plan is to solder a wire to them and crimp a connector on the other end. This is exactly what the OEM version does.

The following video shows how easy it is to install and remove the module. Listen carefully for the click... that has to be the most gratifying click in my entire life ;-)

In the picture below I'm holding the top and bottom steering column covers in place. The switch doesn't look like it's centered in the hole, but that's just an optical illusion.

Switch with the upper and lower steering column covers held in place

The switch is actually two switches; a three-position rotary switch (off, low, and high) for wiper speed and a momentary switch for fluid. The provided Infinitybox harness only supports one speed, but the wiper motor has two speeds. Since I'm going with a MoTeC PDM and a custom harness, I will have two speeds. In addition, I will use the fluid button to toggle an intermittent wiper function. Since the motor is self parking a one-second pulse with a configurable wait interval should provide OEM-like intermittent functionality. Holding the button down for more than one second will set the interval for the amount of time that the button is depressed.

I learned a lot, including a couple of basic tips when modeling things in 3D:

First, when you want to maintain a dimension make sure that you specify it from a point that doesn't change. For example, consider the simple box shown below. The first step is to draw and extrude the bottom. You draw the sides (likely using the offset command) and extrude the walls. Very simple. However, I typically draw on the top plane of the bottom piece because I'm extruding up -- seems intuitive to me. To do this, you simply subtract the height of the bottom from the desired height. However, if you later change the height of the bottom, you also change change the overall height. Sometimes, that's what you want, sometimes not. If you want to maintain the overall height, you draw on the bottom plane of the bottom piece and extrude to the desired total height. I found it a little counter intuitive to extrude the sides through the bottom piece, but it works just as well, no math is required and changing the height of the bottom has no effect on the overall height.

In the pictures below the bottom is 0.2" tall and the overall height is 0.7"

Second, I found that I had issues getting the edges defined by the intersection of  planes at weird angles to look clean. The fix is to extrude one or more of the pieces well over the desired edge and then to simply extrude cut what's hanging over the edge. This is conceptually similar to how laminates or veneers are fitted in the real world. The pieces are cut larger than needed, glued into place and then trimmed with a router.

Ball Joint Upgrade

The SL-C can generate very-high suspension loads which can cause the stock ball joints to wear out quicker than you'd normally expect. In fact, one builder noticed much For this reason, I decided to upgrade all four lower ball joints. The fronts are race-grade ones manufactured by QA1 and the rears are stock because the QA1s won't clear the the rims. The ones from QA1 have the following advantages over the stock ones; they're heavier duty, completely rebuildable, and have an adjustable pre-load.

QA1's rebuildable ball joint; screw-in housing shown, I have the the bolt-in housing

I liked the concept that they were rebuildable, but I wasn’t expecting to rebuild them before they were installed!
Custom aluminum 0.25" ball joint spacers

Custom aluminum 0.25" ball joint spacers

I bought model 1219-103 and discovered that the stud was 1/2" too short. Because they are rebuidable, this was easily fixed by buying the 9029-203 ball stud and installing it (note that I should have bought 1210-203B which comes with the appropriate length stud). My friend Will also figured out that everything was off by 0.25" so he designed a custom spacer, I 3D printed a test for him and then he had several sets water jet cut out of aluminum. This is what they looked like after a little sanding.

The top of the ball is 0.25" closer to the ground which will lower the roll height a little which doesn't seem like it will hurt anything.

Setting the pre-load or rebuilding the ball joint requires custom tools which are demonstrated in the video below.

Rear Reluctor Rings

Cap on the left and CV joint on the right

I installed the reluctor rings for the traction control system on the CV joints. The first step was to remove the end caps which are held in place with a slight press fit and RTV (Room-Temperature-Vulcanization) silicone. It's my understanding that the silicone is used to prevent the grease from leaking out of the bolt holes. The end caps are made of thin metal, so I carefully tapped around the edge of the cap with a hammer and large, flat screwdriver. The first one took a while. The second one went much faster because I used a much larger hammer and bigger wacks ;-)

I then scrapped the silicone from the cap and the CV joint with a razor blade taking care not to let any pieces get into the grease. I was able to get almost all of the silicone off the the CV joint and then I used acetone and a metal finishing pad to get the remainder off. The cap was a different story. Apparently RTV silicone is pretty much impervious to acetone and most other solvents. After doing a little research, I bought some Permatex 80652 RTV Silicone Dissolver. It does soften thin layers of silicone, but it's a nightmare to work with because it has a jello-like consistency. It's almost impossible to get it to adhere where you want requiring you to use ten times more than you would think necessary... it was infuriating to use and I now fully understand some of the negative reviews on Amazon.

The next challenge was to mount the reluctors on the CVs. They use a friction fit and no matter what I tried I couldn't get them on. I could get one edge started, but the reluctor would be crooked and the only way to fix that was to remove it. The answer was to design and 3D print some tools. Specifically, six locating dowels (three short and three long) and a ring driver to apply even pressure on the reluctor when hammered. The only difference between the tall and short dowels is their height. Both hold the reluctor and ensure that it's concentric to the CV joint. The tall dowels also help hold the ring driver in place, but they restrict where you can hit the ring driver (unless I wanted to print a taller ring driver). The short dowels don't cause any interference and they require much less material to print.

The process worked as follows:

  • Clamp the CV joint in a vice so that it is vertical (use soft jaws to prevent scratches). 
  • Insert the three short locating dowels in the CV joint so that they form an equilateral triangle.
  • Insert the three tall location dowels in the remaining holes.
  • Heat the reluctor to 300º F in an oven. This is hot enough to get it to expand, but not so hot as to damage the 3D-printed Onyx parts have a heat deflection temperature of 145º C (293º F) and I figured it would cool a little while being transferred from the kitchen to the garage... ahhh, I mean from my special car-part heater because I never use kitchen equipment for car stuff LOL
  • Twist/tap the reluctor so that its top is flush with the top of the short locating dowels. This ensures that the bottom edge of reluctor is concentric to and just touching the CV joint.
  • Slide the ring driver over the tall dowels taking care to align it so that the depth gauges won't collide with any of the dowels.
  • Place a piece of square metal tubing on the ring driver and hammer on it until until all three depth gauges are seated on the CV joint. After every wack check to see if the reluctor is askew and wack the opposite side to straighten it if needed. I found that rocking the reluctor seemed to work better than trying to drive it straight down.

It worked like a champ!

The next step was to reinstall the caps. I used a hammer to carefully straighten the edge of the cap which had been somewhat misshaped when banging it off with the screwdriver. Once that was done, I applied Loctite 37461 Blue RTV Silicone Gasket Maker to the CV joints and gently tapped the caps on with a hammer. I immediately installed the axles so that silicone would be properly compressed before it dried. I decided to mount the reluctor next to the transaxle rather than the hub because the hub bounces up and down. I may need to change this when I route the exhaust, but that's easy to do later.

Busy Day

I installed the wheels, nose structure and diffuser. I then realized that the mounting flange on the left nose structure vertical was partially sitting on the extended foot box's weld bead. So, I marked it, took everything apart, cut it on the bandsaw, dressed the edge on the belt sander, and reinstalled everything.

See kids, trigonometry is useful in every day life!

I then set the front and rear ride height which took longer than expected. For each corner:

  • Measure the ride height to determine how much higher or lower the chassis needs to go
  • Roll the car about 18" to center it on the lift blocks (the recessed lift gets in the way when doing the above measurement)
  • Lift the car to reduce the tension on the suspension (it's hydraulic so that's just a matter of pressing the correct button) 
  • Rotate the ride height adjustment collar enough times to make the desired change. This is just a guess. I assume that if I took some careful measurements and applied basic trigonometry I could figure out much each twist equated to
  • Lower the car
  • Roll the car 18" so that a measurement can be taken
  • Measure
  • REPEAT as many times as necessary

Part of the challenge is that when the suspension is at full droop, like when the car is on a lift (or airborne), the spring loses all tension. This allows the lift ram to shift and lose its concentric alignment with the shock. When the car is lowered the lift ram might not seat properly. Not good because it's under tension and hung up on the lip which is going to throw the ride height of by a quarter of an inch or so. This will cause the car to pull to one side... really a bad situation if you get airborne like the dudes in the Ferrari and the car pulls to one side when you land. 

The ride height adjustment collar is the round, gold piece above the green tape

The ride height adjustment collar is the round, gold piece above the green tape

Rear shock. Spring retainer is above the spring and the ride height adjustment collar is below the spring

Rear shock. Spring retainer is above the spring and the ride height adjustment collar is below the spring

The fix is to lift the car, align the lift ram and set the car down again. You want to mind your fingers so that they don't get pinched if it snaps back... dooh! now the other side is off. Even with a push-button lift and a helping hand, this gets tedious fast. Zero-rate springs solve this issue. They have a nominal spring rate and when the suspension is under tension they are completely compressed (i.e., no change to the normal state of things). However, at full drop they apply just enough pressure to keep everything in alignment. So, I need to look into getting a set ASAP. However, to install them I need to remove the wheels, remove one side of the upper control arm, undo the top of the shock, install the new springs and then put it all back together again;-)

While adjusting the rear shocks.... PWANG, WTF just happened? The spring was applying enough pressure on the spring retainer so that as I was tightening the ride height collar I was loosening the spring retainer... until it came off and the spring, which was under tension, was no longer retained! Other than skipping a couple of heart beats, no damage done. Lesson learned, make sure that the spring retainer doesn't spin when turning the ride adjustment collar. It seems to me that Penske should have used a left-handed thread on the spring retainer to prevent this from happening.

I also realized that the sway bar needed to be padded a lot further from the monocoque than I expected because it was hitting the upper control arms This means that the custom pillow blocks that I had machined will need to be replaced. I kept inserting washers until it was in the right position. I then made and installed temporary 3D-printed spacers. I'm not going to machine another set until I'm 100% sure.

The car hasn't been on it's tires in six months... I almost forgot how bad ass low the car when it's sitting on the ground!


Bantam vs. Vapir

I received the Bantam II and Vapir III mockup cases last week. I think that I’m going try and make the Vapir III work. It’s ½” wider and 4” longer than the Bantam, but it has the following advantages:

  • 18% larger A/C coil
  • Dash vents come out side vs. top
  • 4 vs. 3 dash outlets

As previously stated, the biggest challenge will be the height. It’s 11.25” which is 0.25” taller than what’s stated on their website. However, the only vents on the top are for defrost. They are 1” high and I’m pretty sure I can cut a hole which has more surface area and 3D print an outlet that is only ¼” tall. In addition, as you can see in the pictures below, the end with the motor is much deeper so if I point that end towards the nose I’ll pick up a lot more leg room. At the shallow end it’s only 2-3/4” taller than the Slimline. The deep end is5.74” taller than the slimline, so the next step is to temporarily install the dash so that I can figure out how far I can raise it through the foot box.

I tried to compare the A/C capacity to the Slimline. Neither publishes numbers, but the RestoMod Air (RMA) uses a high-output, OEM-style whereas Vintage Air doesn’t. The Vapir III has a high-quality, 20” 4-row A/C coil. I haven’t taken the Slimline apart, but RMA claims that their smallest unit, the Batam II, has more cooling capacity that Vintage Air’s largest GenIV system… who knows, but I think that it’s clear that the Vapir III, which has 18% more capacity, should have a lot more capacity than the Slimline, which you’d expect given the price point. 

Unfortunately, the mocking case doesn’t come with heating and A/C connections. The picture below is from their website. Note at all four of the connections exit the case above the motor.

Transaxle Mounted for Fitment

America first; stop sending all of those cars

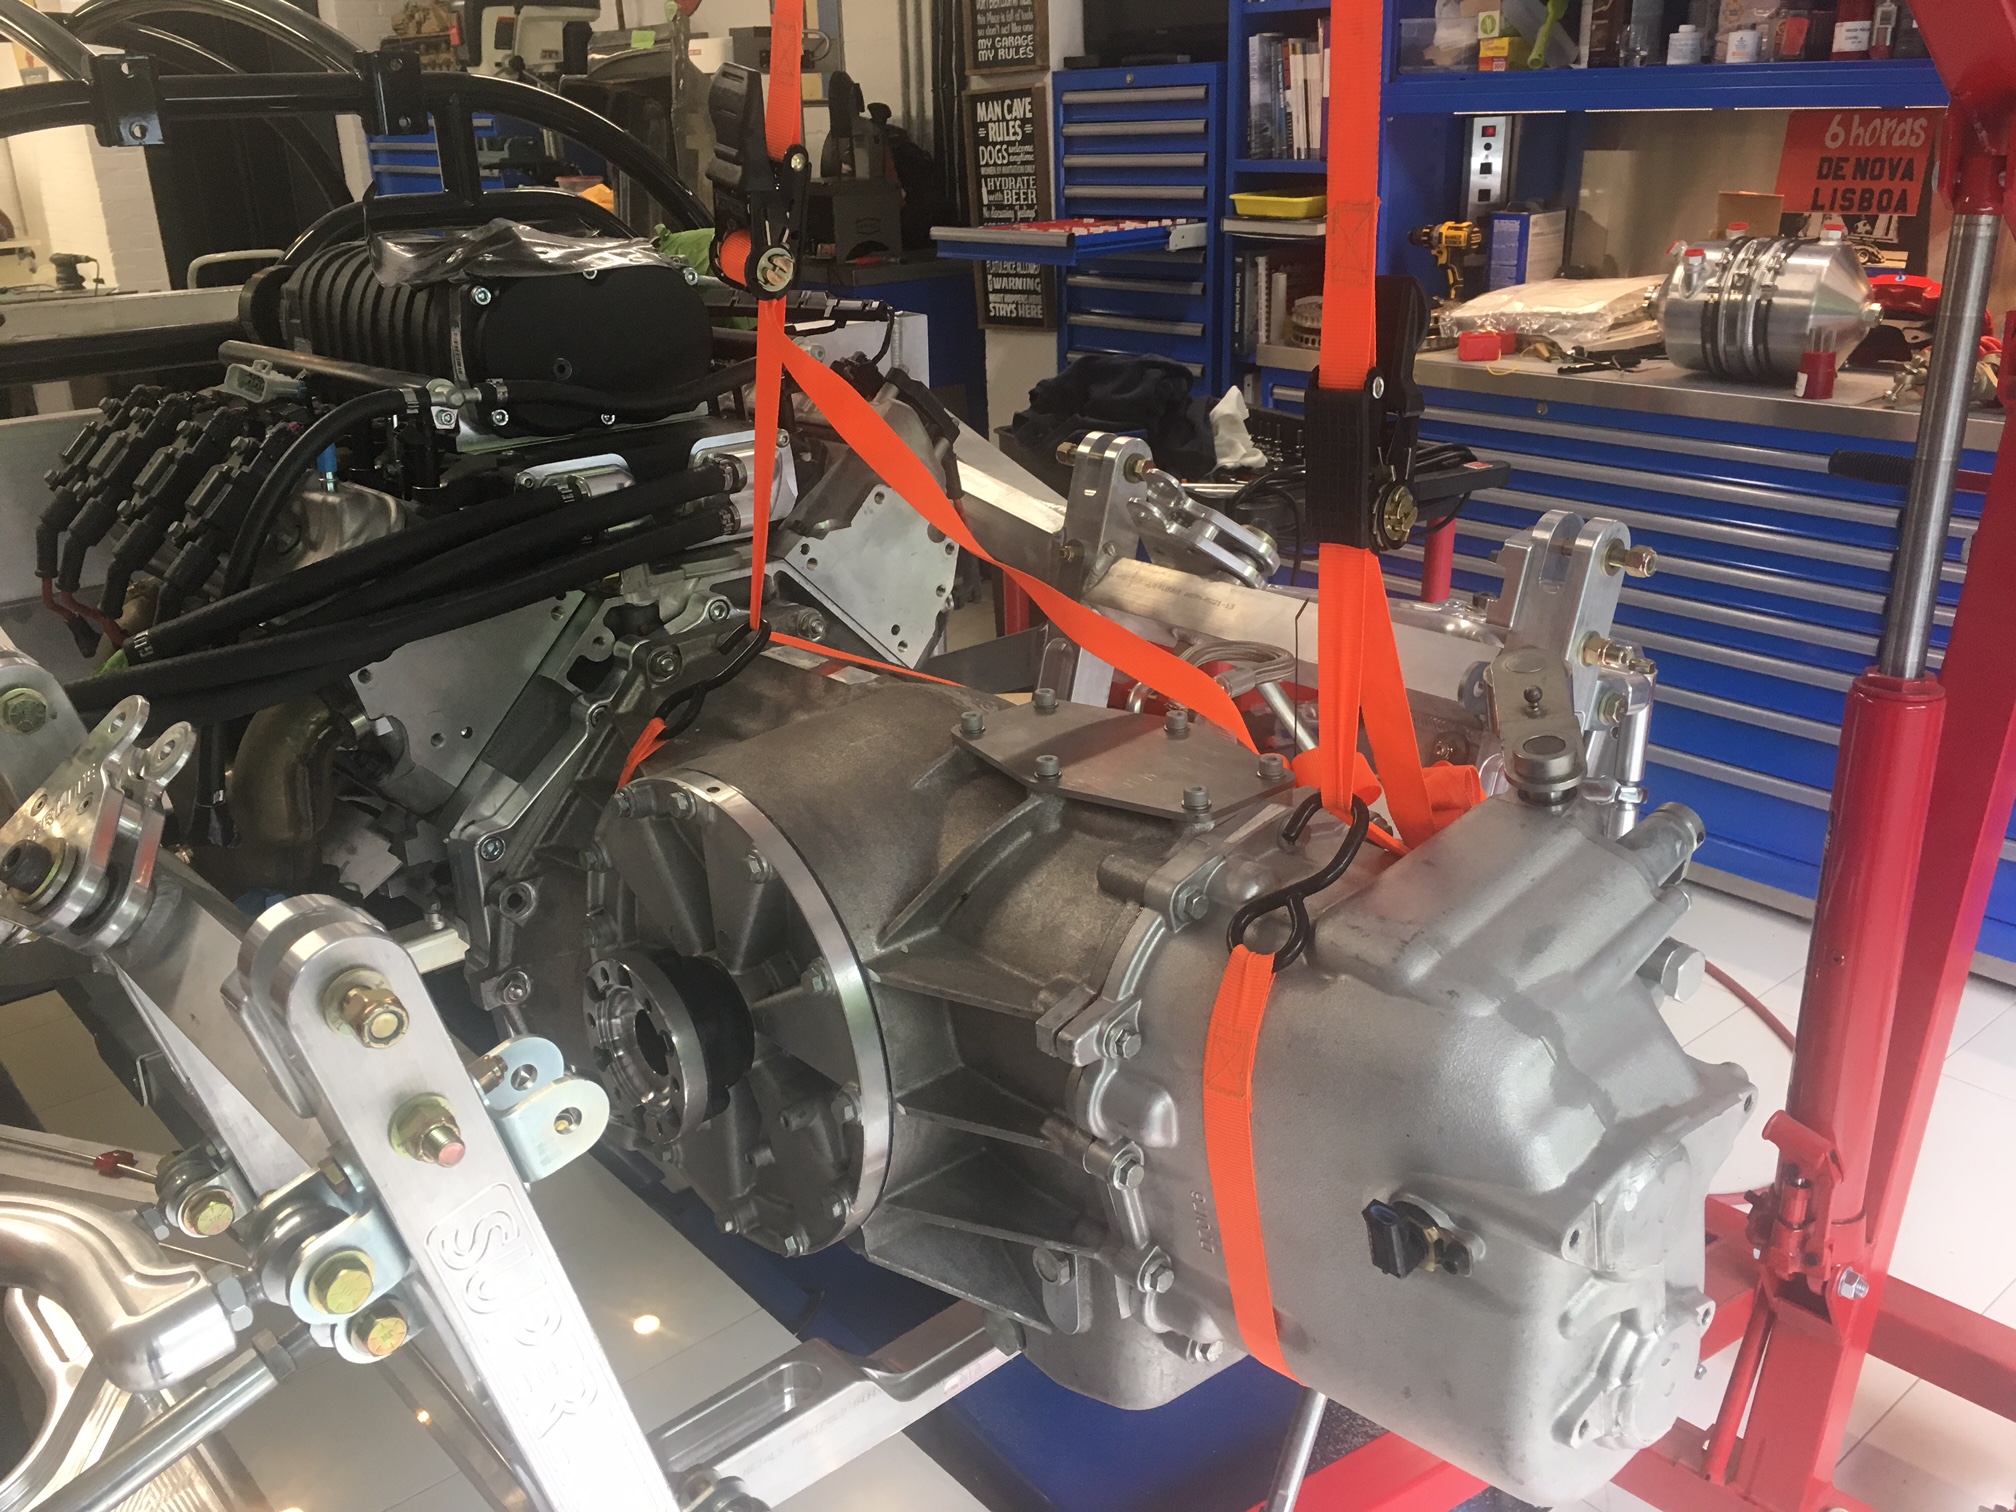
I installed the transaxle for fitment purposes today (i.e., without the flywheel, clutch and pressure plate). Holy crap is that thing a monster... let me express it in Trump speak because, apparently, that entitles you to say whatever you want.

"It's huuuuge... much bigger than the Porsche or Graziano transaxles. It's designed for an America-first V8 and supports the most ever horsepower... not like those weak, whinny-sounding, Euro-trash engines." Of course CNN would have to explain that the Ricardo is actually made in the UK and that some people actually like the sound of those engines built by our allies.

Engine hoist load leveler

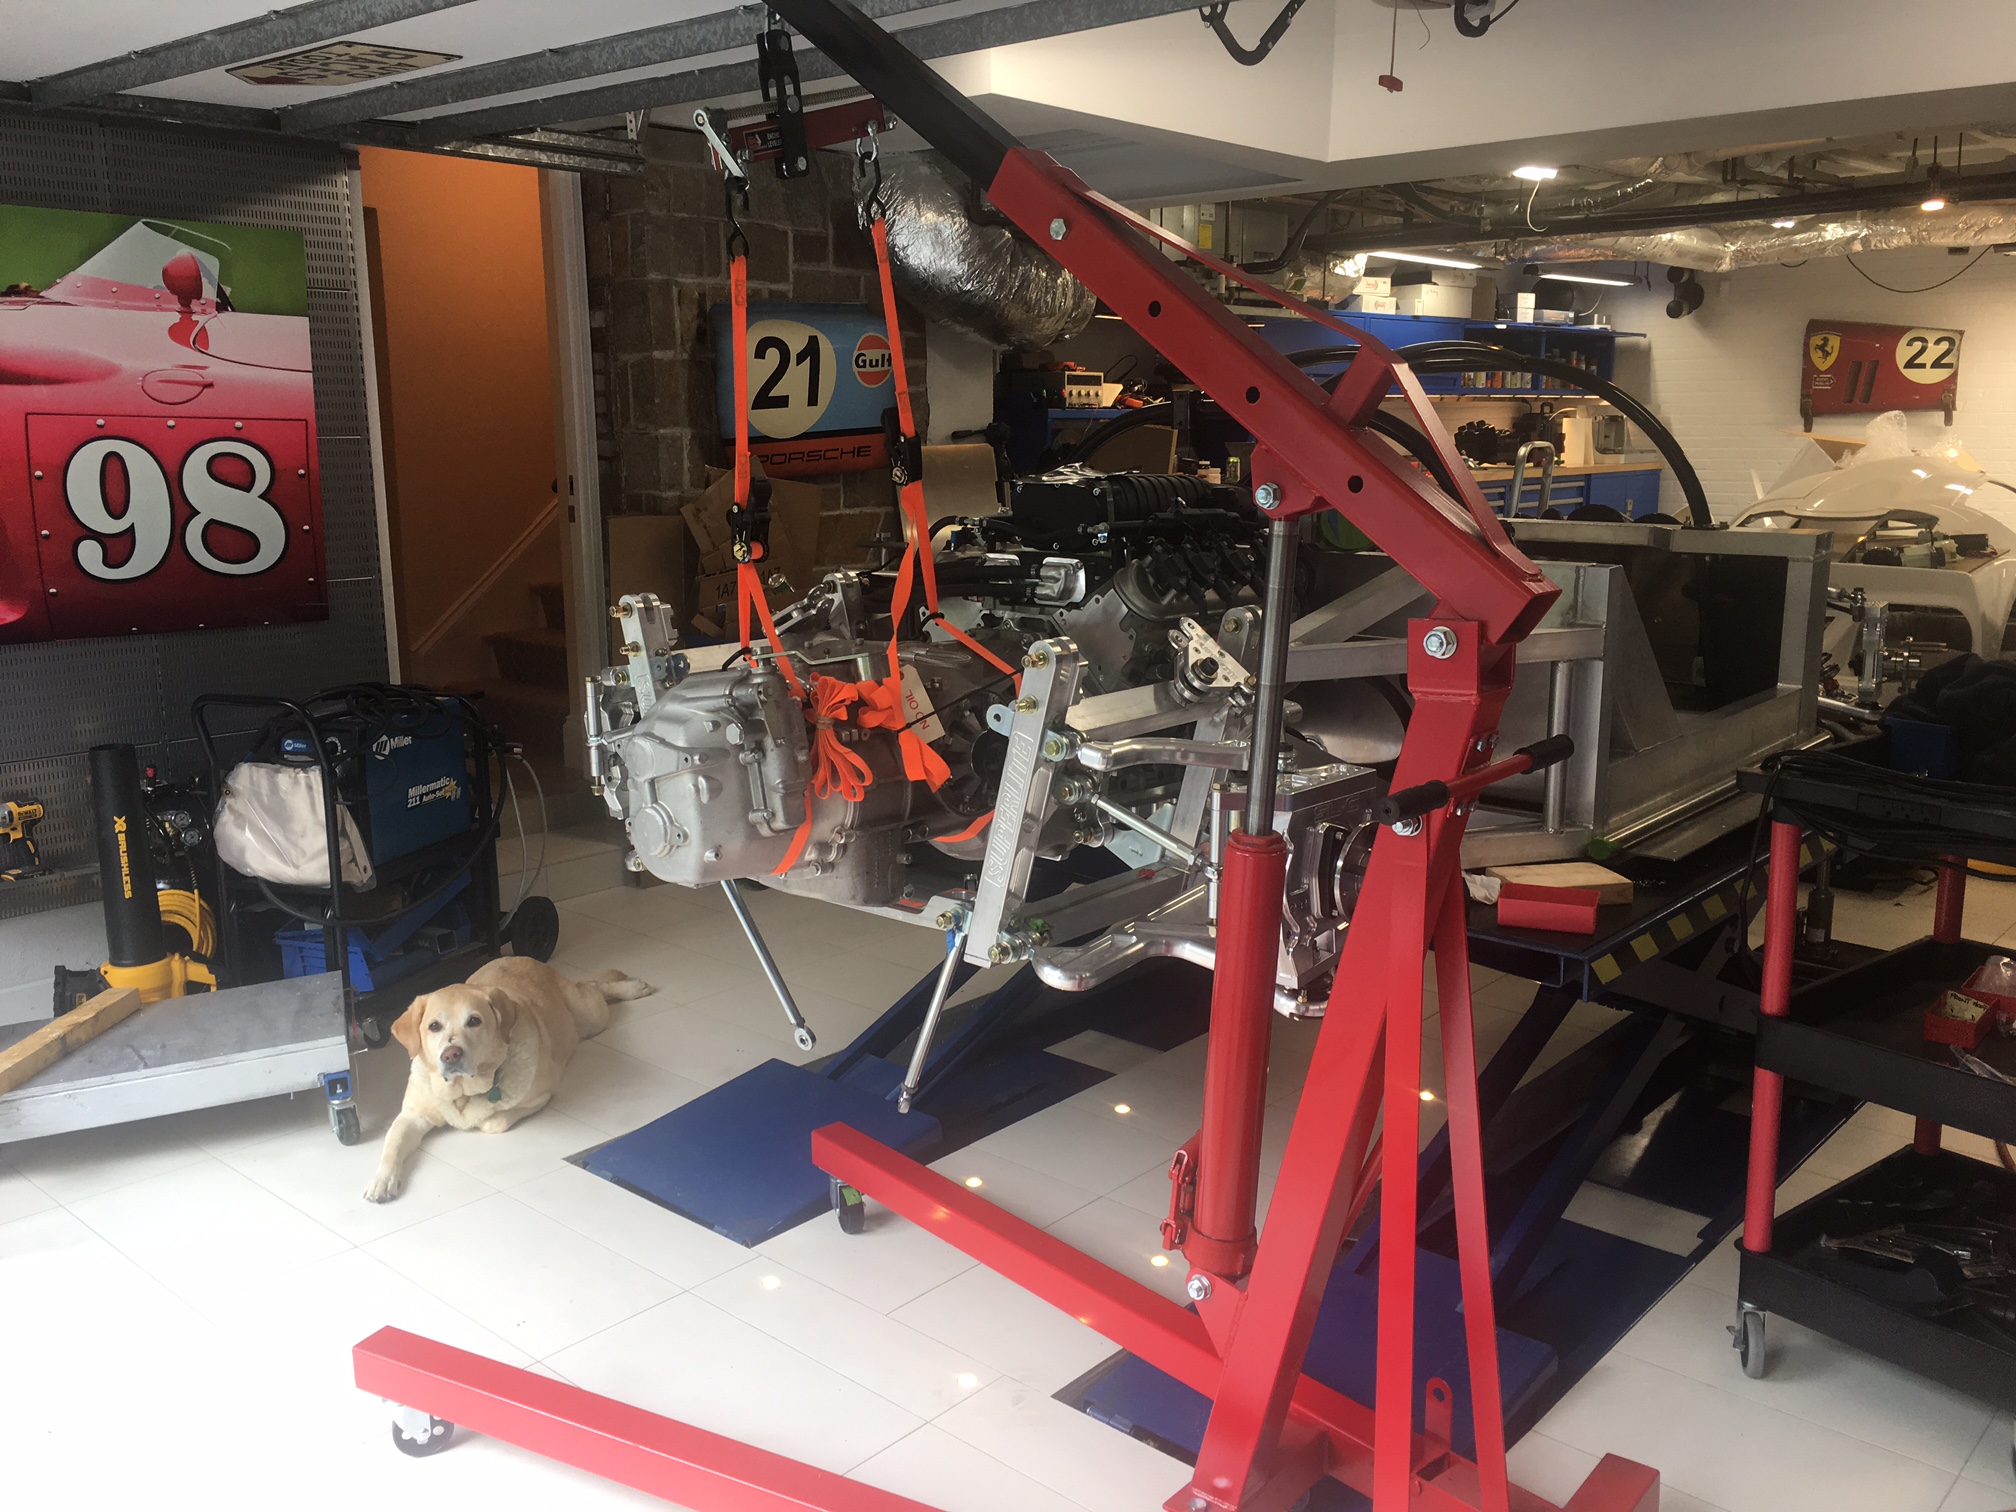
The first step was to remove the shocks and rear suspension cross brace and to find someone to help me. We used two ratchet straps to connect the transaxle to an engine hoist load leveler. Rotating the full-length screw tilts the leveler which is very useful when trying to compensate for off-center loads or adjusting the load to a certain angle. While the leveler made it easy to adjust the transaxle lengthwise, we had to adjust the straps a couple of times to get everything level left to right. 

Six M10-1.5 hex head screws mount through the transaxle adapter plate which has hex-shaped recesses that keep the screws from spinning. The top four are sandwiched between the engine block and the adapter plate so they act like wiggly studs. The bottom two screws are easily removed. After multiple attempts to line everything, we realized that two of the screws had a slight bend. So we threaded several nuts on each to protect the threads and wacked them a couple times with a hammer -- problem solved. We were then able to get one of the locating pins (installed in a previous post) in without too much effort, but the second one refused to go it. We put a little anti-seize on it and after an appropriate amount of profanity we got things lined up. It was a lot more difficult than I expected to pull things together which I assume that was due to the tight fit of the locating pins.

The only way to pull everything together is to tighten the six screws, but because of their length we had a hard time getting the nuts started. In fact, on the bottom we had to temporarily use longer screws. We then very carefully tightened everything down in a star pattern to rock it down so as to not crack the cast aluminum bell housing. I'm now wondering how the hell I'm going to get it off and if I should take the adapter plate off and use longer screws.

I forgot to mention that we got it half way on once and then realized that the washers and nuts that are used to mount the adapter plate to the chassis bracket were in the way (see picture below). Everything off and then on again. Practice makes perfect, right? The cool thing about my 3D printer being cloud based is that even though I'm traveling I was able to design a simple custom spacer and kick of test print. It will be waiting for me when I get home and if it fits, I'll have it machined out of aluminum. 

Human Heater

I'd be a excellent human-powered battery

I have an amazing ability to steam up a car. I'm not sure what the hell the issue is, but it starts at the window nearest me and migrates out in a radial pattern. I'm sure that I would make a great human battery for the Matrix -- LOL

In any event, the SL-C can run hot and while I don't need as much HP as I have, I do need a really good A/C system. When I went to install the supplied Vintage Air Slimline evaporator I discovered that it wasn't even close to fitting because I had purchased the optional removable side-impact bars. The only way to make it work is to rotate it 90 degrees and cut a big hole in the monocoque. I resisted doing this for a long time, but I'm now convinced that it's the only viable option.

So, I started down that path and I laid out the Slimline unit and all of the electronics. It was at this point that I realized that the fan unit only had three speed settings; low, medium and high. To fix that limitation I was planning on using a MoTeC PDU to Pulse Width Modulate (PWM) the fan to get infinite fan speeds. There must be a better way, right? After a lot of searching I found RestoMod Air who makes a high-end solution. While none of the other builders have used one, it appears to have the following advantages:

  • Smaller cut in the monocoque
  • Serviceable box (not all glued together)
  • Electronic controls; mode, temp, dash/defrost/heat
  • Bluetooth control via iOS or Android app
  • Better quality – at least according to their over-the-top marketing
  • Really nice billet control options, including a single-button one
  • SPAL fan with infinite speed control
  • Separate heating and cooling coils

The primary downsides are:

  • It's 4.25" taller and might take too much space in the passenger's foot box
  • The heater control valve doesn't have a bypass (i.e., won't work with a LS engine)
  • No one has installed one in an SL-C yet
  • The vents point upward so I'll have to design custom 3D-printed adapters
  • It's comparatively expensive

The first two, are the only real issues. I called RestoMod and they offer a mocking case which includes a plastic motor house for $125. It's refundable so long as you pay shipping both ways. I ordered their two smallest Bluetooth-enabled versions; a Bantam II and a Vapir III. The picture below shows the actual size (hole will need to be a little larger) of the two units and their approximate location. The longitudinal orientation is due to the removable side impact bars which prevent it from being installed transversely. The rectangle with the black border represents the increased length of the Vapir III.

The heater control valve actuator is from the same Chinese supplier as the one that I made a 3D bracket in this earlier blog post, but the output shafts are different, the mounting holes are different and the ECU is integrated rather than being standalone. So, I either need to machine a shaft adapter and print a new 3D bracket OR maybe I'm lucky and the control protocol is exactly the same and my current actuator will just plug-and-play. The wiring connector is the same. Anyone want to bet which it will be?

Front Hubs... Done

I put the front suspension back on today. It's not final, but I need to take some measurements for the front sway bar drop links and I need to get the tires on so I can roll the chassis around and install the transaxle. As discussed in a previous post, I spent a lot time looking for new hubs with integral wheel speed sensors for the traction control system. I wound up with a high-end hub which required both it and the upright to be machined. I probably measured 50 times to make sure that I wouldn't have a fitment issue... and it all worked.

The round black plastic cap on the upright has an electrical connector for the wheel speed sensor... one thing done.

Transaxle; Not So Fast

Sleeve guide

Sleeve guide

I want to temporarily mount the transaxle and axles so that I understand what space I have left for all of the other systems. So, I'm not going to mount the flywheel, pressure plate and clutch at this time.

The first step was to mount the two sleeve guides (part number F5RZ-6397-C) into the transaxle. They're a tight fit and they need to be gently tapped in so as to not crack the cast aluminum. 

The next step was to mount the adapters to the hubs on the transaxle using the bolts and lock washers provided by The Drive Shaft Shop. I was only able to install one, because I am missing one of the lock washers.

Thread checker

Once that was done, I attempted to install the axles using the longer bolts. One of the other builders told me that the screws were often tight and that he used an impact gun to set and remove the screws once which is a lot easier to do before the transaxle in the car. In any event, I was able to get one thread started with my fingers and then it got real tight. So I pulled out the impact gun and was about to pull the trigger when I began to think that it was too tight... STOP, THINK... better get the thread checker. They sent M10-1.25 screws and should have sent M10-1.5. So the right sized screw with the wrong thread. Check twice, install once -- or profanity and crying will be involved. It's important to have a thread checker and I've found mine invaluable.

Mounting plate

I also mounted the transaxle top plate with six M8-1.25 x 25 mm screws and washers. Next step is to temporarily mount the transaxle, weld mounting tabs to the top plate and rear suspension cross brace and then install the axles when the correct bolts arrive.

Front Swaybar Mounted

Two posts ago, I machined and cleaned up the pillow blocks for the front sway bar. I got around to mounting them today. First I removed the nose structure to facilitate drilling drill holes in the monocoque.

The next step was to figure out where to position them. To achieve the best stability the pillow blocks should be spread as wide as possible taking care not to hit the suspension screws that mount on the side and protrude into the foot box. Height wise things are tight (that's why I machined them) and I did my best to position the one on the left side between the top weld bead and the steering rack's bellow. It's important to note that the height of the bellows change and they're stretched and compressed when steering.

Hole transfer punches

I then drilled a hole in the chassis for the top hole of the pillow block. The best way to mark the center of a hole is using a hole transfer punch. Simply find the largest one that fits, insert it and wack it with a hammer.

I then mounted the sway bar using just the top screw. The reason that I did this before marking and drilling the bottom hole is because the sway bar needs to be parallel to the ground and free to rotate within the pillow block. If the hole was slightly off it would cause the sway bar to bind and the only way to know the exact position of the hole is to have the sway bar parallel to the ground. Since the garage floor isn't perfectly level, I tried using a digital level on the top of the monocoque so that I could transfer that measurement to the sway bar.

I kept getting different angles -- either too much scotch or something's up. I placed a large level on top and, as can be seen in the picture blow, it's not flat (have another sip of scotch and ponder).

I assume that this is due to warping during welding and since it isn't a part of suspension geometry, it isn't an issue unless you're taking measurements assuming that it is level;-) Next I tried using the level of the sway bar which also didn't work well. I then decided that the the best approach would be to place temporary spacers between the steering rack brackets and the sway bar. The reason for this is that the holes for those brackets are CNC cut on a single piece of aluminum. After a bunch of rummaging through drawers I found a pair of precision-ground milling blocks that were a perfect fit.  I'd like to say that I planned it that way, but I just got lucky. 

When I went to install the second block I discovered that the top hit the weld bead so I used my new mini-belt sander to knock it down. After that, it was a simple matter of installing that top screw in the second pillow block and then installing the bottom screws. If you look at the installed pillow blocks they look really uneven when compared to the weld bead, but I guarantee you that the sway bar is perfectly parallel to the steering rack!

While I didn't need to install the lock collars, I decided to give them a whirl. Well, they don't fit between the sway bar and the chassis. My guess is that this is because the I had the inside diameter of the pillow blocks increased which brings the outside diameter of the sway bar closer to the chassis... yep, one change often had an unexpected ripple effect and I've learned to give things a try before I need to complete a step.

I still have a lot of work to do make the sway bar functional. Specifically, I need to implement the adjustable cables and I have to have custom drop links made.