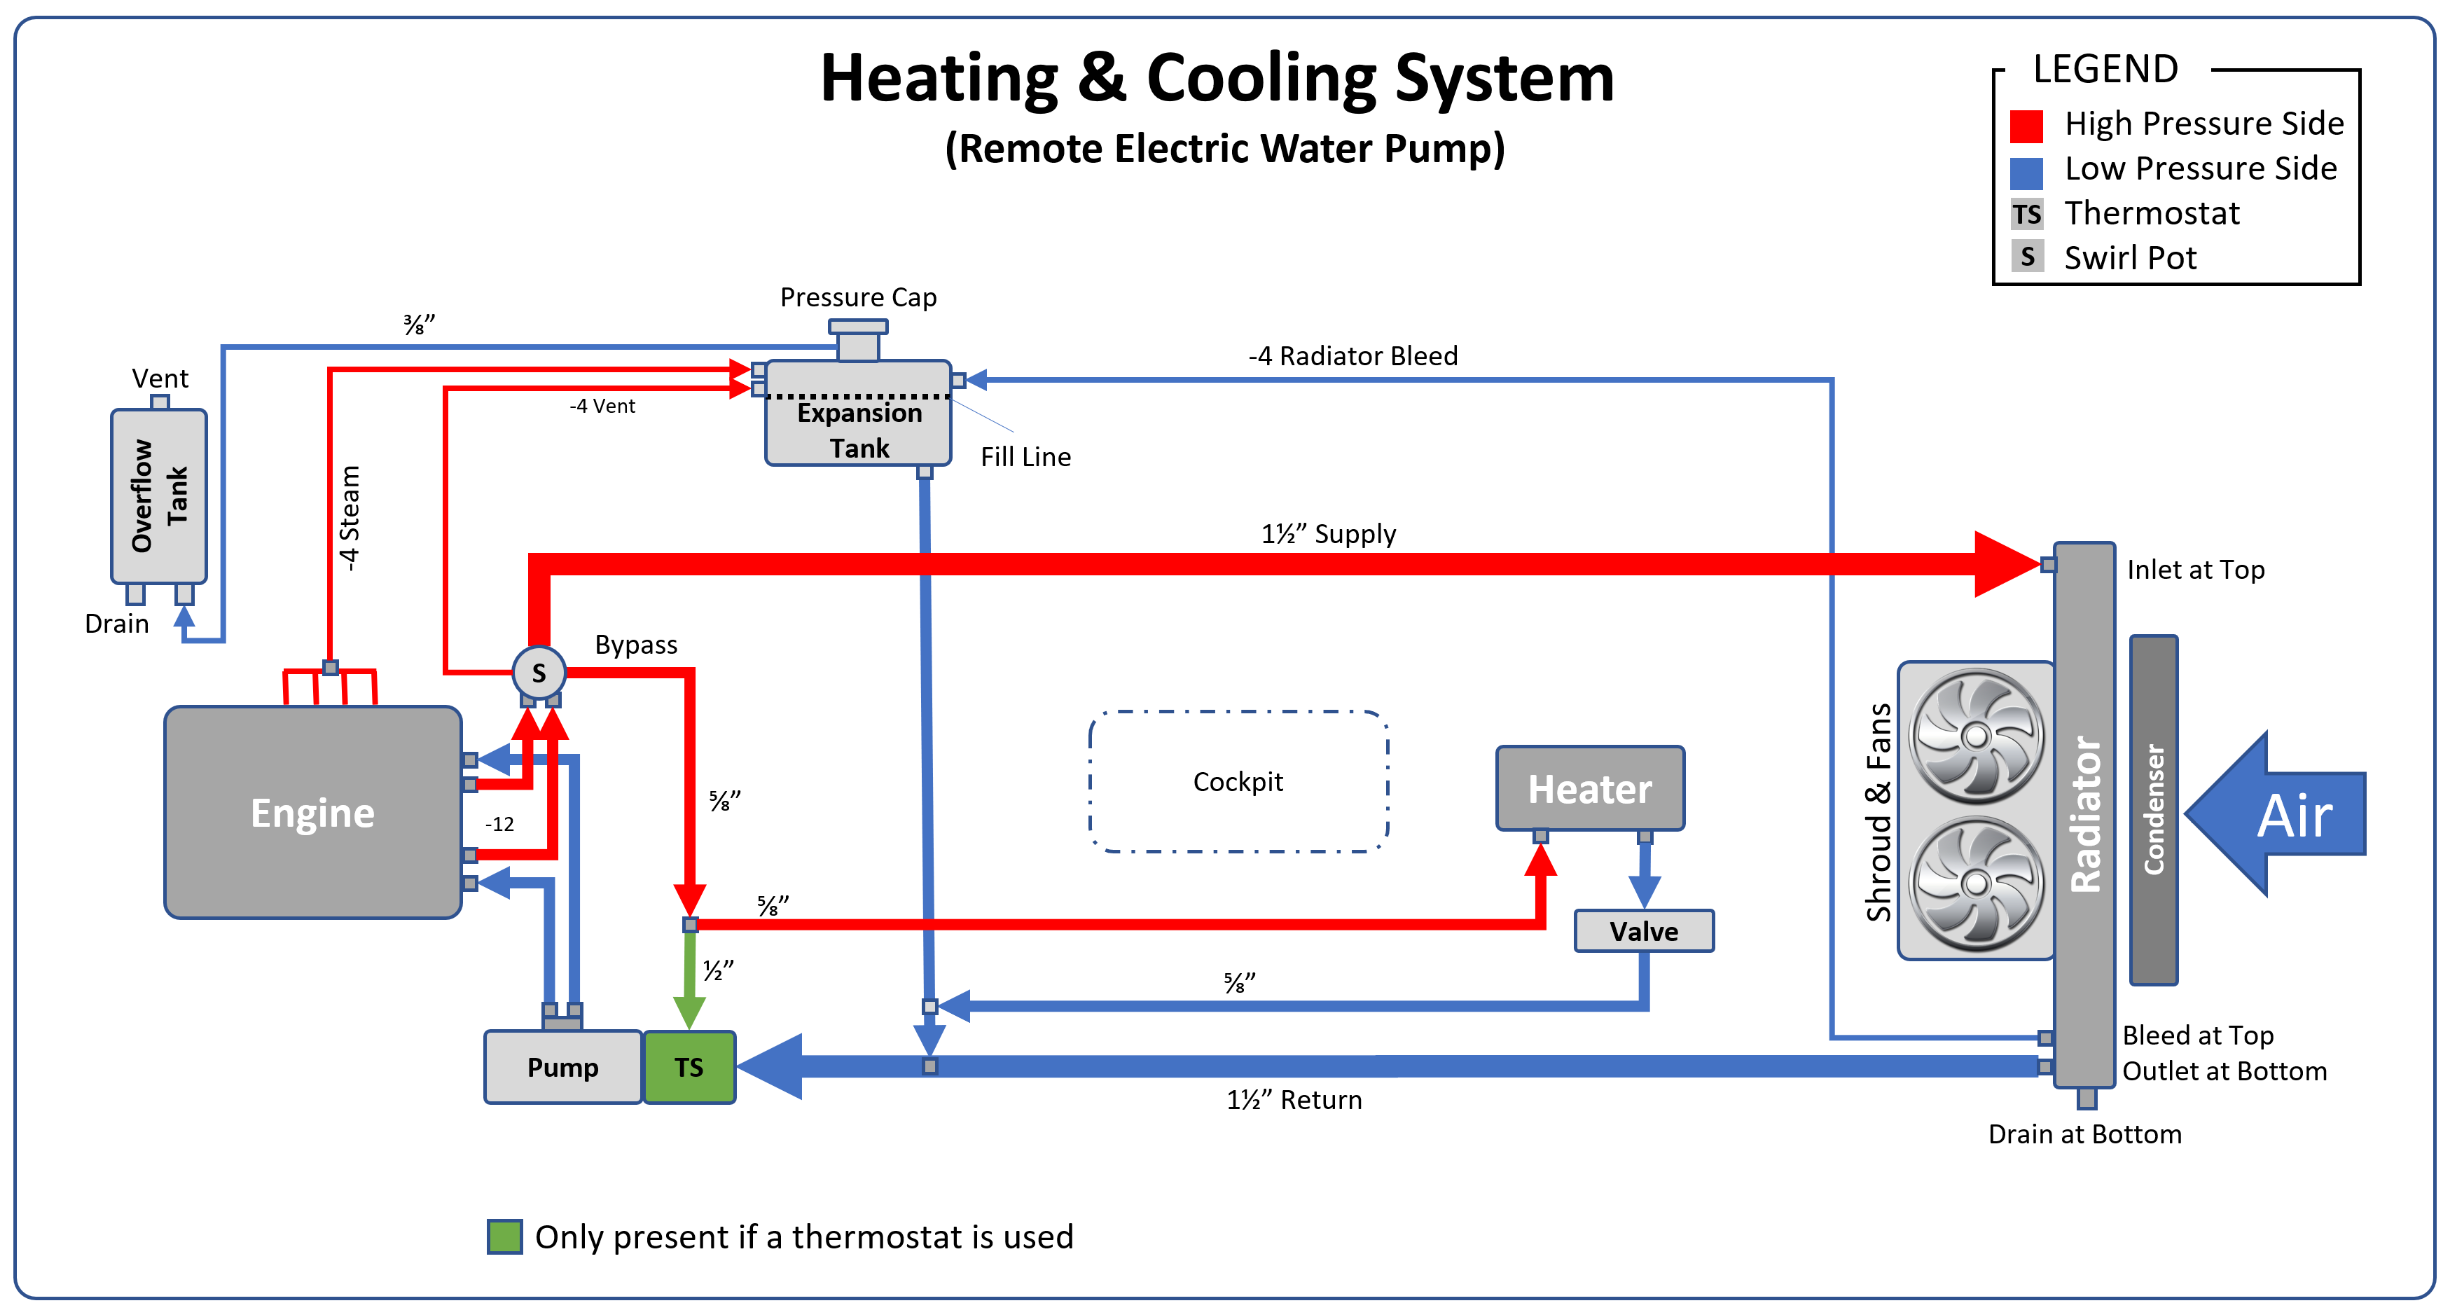
One of the many challenges with a mid-engine car is bleeding and then keeping air out of the cooling system. This is critical because as the amount of air increases there is an exponential loss of heat transfer efficiency; 2% air results in a 8% loss of efficiency and 4% air results in a whopping 38% loss!
Cooling systems are pressurized because higher pressure results in a higher boiling point. For example, water boils at 212° F, but at 20 psi it doesn’t boil until 259° F. This is a good thing because GM’s LS engine management doesn’t kick on the cooling fans until 220° F. High-performance cars run at 22-24 psi, racing cars run at 29-31 psi, and Formula 1 cars run as high as 50 psi.
A pressure cap provides the cooling system with a relief valve. Without it, pressure might build until something burst. The pressure cap is placed at the highest point in the cooling system to collect air bubbles and steam. If the pressure exceeds the cap’s rated threshold, the cap opens to relieve the pressure. On most cars the radiator is higher than the engine and the pressure cap is built into the top of the radiator. This is so common that the pressure cap is often referred to as the radiator cap.
However, the SL-C is really low and the top of the radiator is below my knee… and I’m not tall. For this reason, the pressure cap must be relocated elsewhere. The solution is a coolant expansion tank which serves two purposes. Firstly, it allows the pressure cap to be relocated from the radiator to the highest point in the cooling system (in my case as high as possible on firewall in the engine compartment). Secondly, it serves as a deaeration chamber, which continually separates air bubbles and steam from the coolant.
The expansion tank is known by many names (e.g., surge tank, recirculation tank, coolant expansion fill tank, deaeration tank, etc.) and it is often confused with the overflow tank which serves a completely different purpose. The expansion tank is pressurized (it has a pressure cap) and when the pressure rating is exceed the cap opens and it releases the steam that has collected underneath it. Once all of the steam has been purged it may release some coolant. Many street cars allow released coolant to overflow onto the road, but that approach won’t pass tech inspection at most tracks for obvious reasons.
To address this hazard, an overflow tank is used to capture any coolant that’s released by the pressure cap. The overflow tank isn’t pressurized — otherwise it would need a pressure cap which would need to overflow to another tank which would accomplish nothing. The hose from the expansion tank is usually plumbed into the bottom of the overflow tank so that when the car cools and the coolant contracts the overflowed coolant is drawn back into the system.
Second-Gen Tank
I copied a tank that was designed by some early builders (Mesa, Howard and Will) and I made the following changes:
The engine steam and radiator bleed connections were moved from the bottom to the top of the tank to improve deaeration (i.e., air bubbles and steam don't need to percolate through the liquid).
The mounting flange was replaced by four aluminum spacers that provide a 1/4” air gap between the tank and the firewall to reduce heat transfer into the cockpit. To accommodate this, the tank is 1/4” thinner.
A sight tube was added.
The hose barbs were replaced with female ORB weld bungs. This allows a wide range of fittings to be used (e.g., AN fittings, hose barb, etc.) which means that I can change my mind on how things are plumbed.
A bung was added to the bottom of thank for the swirl pot bleed line.
The aluminum thickness was increased from 0.093" 5052 aluminum to 0.125". A little thicker than necessary, but I never wanted to have an issue.
A baffle was added to reduce coolant sloshing. This, combined with the thicker aluminum, will prevent the rear from bulging when pressurized as observed by several owners of the gen-1 tanks.
I modeled the tank using the sheet metal features in SOLIDWORKS. The aluminum pieces were designed to have a 50% (i.e., 0.0625”) overlap to provide perfect corner weld joint. It looks good in CAD, but time will tell if it comes out as planned ;-)


It took a little while for me to figure out the sheet metal features, but that effort was rewarded because SOLIDWORKS generates the flat patterns and bend lines to form the shape. This takes into account the type and thickness of the material, the bend angle, roll radius, etc. The image below shows the shape and three bend lines to form the top.